
Author
After 19 years in vehicle inspection, the tire problem I recorded most often was not worn-out tread. It was pressure: tires run too soft or pumped too hard, because the owner never looked up the values the manufacturer specifies for that vehicle. Most drivers don’t read the technical documentation, so they guess, and the guess is usually wrong.
Wrong pressure doesn’t only wear out the tires. It wears the shock absorbers too, and the result is the same in both cases: poor grip, longer braking and a vehicle that doesn’t hold the road the way it should. On a heavy RV, that’s a real safety problem.
This guide is the hub of everything RVGeo publishes on RV tires: what actually destroys them, how to read their age, how to set pressure from the manufacturer’s values and your real weight, and what to buy when it’s time to replace or protect them. If you only read one tire article before your next trip, make it this one.
Why RV Tires Fail: 7 Factors I See in Inspection
RV tires rarely fail for a single reason. In inspection, the damage usually comes from one or more of these seven factors, and tread depth is the last thing to tell you about them.
- Under-inflation. A soft tire flexes more on every rotation. It wears on both outer edges of the tread (the shoulders), builds heat and can fail from the inside. NHTSA warns that low inflation can lead to a blowout or tread separation.
- Over-inflation. Just as common, and just as damaging. An over-inflated tire wears down the center of the tread, puts less rubber on the road and grips worse, especially in the wet. It also stops absorbing bumps, so the shock absorbers and suspension take the hits instead.
- Mixed tire structures on the same axle. Two tires with different construction on one axle, for example radial and bias-ply, or ST and LT, don’t flex, grip or carry load the same way. The axle pulls, the tires wear unevenly, and one tire ends up doing more than its share.
- The wrong tire category for the vehicle. A passenger-car tire on a motorhome, or a tire built for a light trailer on a heavy fifth wheel, is working outside what it was designed for.
- A load index or speed rating that doesn’t match the vehicle. Every vehicle has minimum load and speed ratings for its tires. A tire below them is overloaded or overheated from the first mile, however new it looks.
- Poor wheel balancing. An unbalanced wheel vibrates. That vibration creates patchy, cupped wear on the tread and hammers the shock absorbers and steering parts.
- Heat and sun exposure. An RV parked in the sun month after month bakes its tires. UV and heat dry out the rubber and crack the sidewalls, even on a rig that barely moves.
Age makes every one of these worse. Rubber hardens over time whether the tire rolls or not, which is why the date code matters as much as the tread. That’s the “glamour vs. structure” trap I see with RVs in general: buyers check the shine; an inspector checks what’s underneath.
Under- and over-inflation often happen on the same vehicle
In inspection, under- and over-inflation showed up about equally, and often on the same vehicle: front axle over-inflated, rear axle under-inflated. The usual cause is the gas station. Attendants fill every tire to one standard figure, while the vehicle manufacturer specifies different pressures for the front and rear axles, and different values again for a loaded or unloaded vehicle. One number for every tire is wrong for at least one axle.
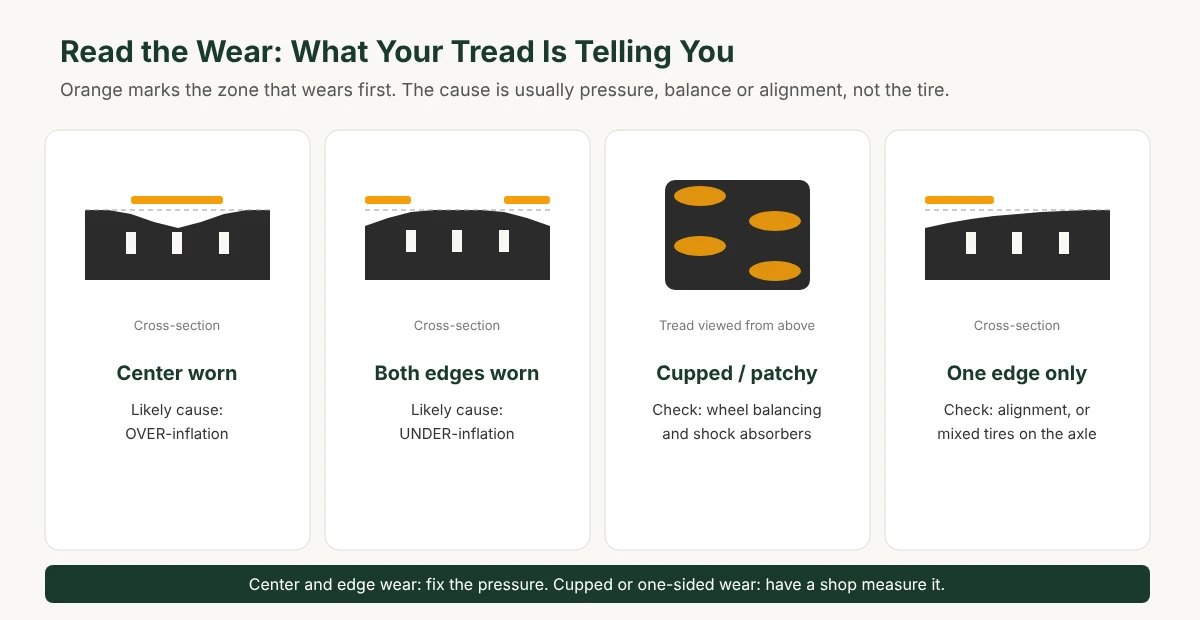
The tread tells you which mistake was made:
| Wear pattern | Most likely cause |
|---|---|
| Center of the tread worn more than the edges | Over-inflation |
| Both outer edges (shoulders) worn more than the center | Under-inflation |
| Patchy, cupped or scalloped wear | Wheel imbalance or worn shock absorbers |
| One edge only | Alignment problem, or mixed tires on the axle |
The fix starts with the manufacturer’s values
Most of these failures are avoidable with information that already exists. The vehicle manufacturer specifies the tire size, load index, speed rating and pressures on the tire placard and in the owner’s manual, and the tire maker publishes load and inflation tables. Read them, follow them, and you’ve already eliminated the most common tire defect I recorded in inspection.
How Long Do RV Tires Last?
RV tires usually age out before they wear out. A tire ages chemically even when it isn’t rolling: the rubber oxidizes, hardens and develops micro-cracks from UV and temperature swings. That’s why the date on the sidewall matters as much as the tread.
Here’s what the tire makers themselves say:
- Michelin: in its technical bulletin on service life for RV and motorhome tires, Michelin says tires in use for five years or more should be inspected by a specialist at least once a year, and that any tire, spares included, should be replaced after 10 years.
- Continental: in its caravan season advice, Continental recommends replacing tires more than six years old, whatever the tread depth, and applies that to motorhome, caravan and trailer tires too.
From my years in inspection, I’d add two things. First, start watching closely from year three. That’s when a tire begins to lose its original suppleness, and on an RV that sits in the sun under full load, the early signs (fine sidewall cracks, harder rubber) show up sooner than on a car.
Second, for trailers and motorhomes, six years is the hard limit, not a suggestion. A caravan spends most of its life parked, exposed to UV, slowly losing pressure on tires that carry its full weight in one spot. Stretching those tires to eight years is a risk I wouldn’t take.
| Tire age | What to do | Source |
|---|---|---|
| From 3 years | Inspect closely before every season: sidewall cracks, hardening, deformation | Inspector’s field practice |
| From 5 years | Specialist inspection at least once a year | Michelin |
| 6 years | Replace motorhome, caravan and trailer tires. No extensions. | Continental + inspector’s rule |
| 10 years | Absolute limit for any tire, including spares and the heavy commercial tires on Class A motorhomes | Michelin |
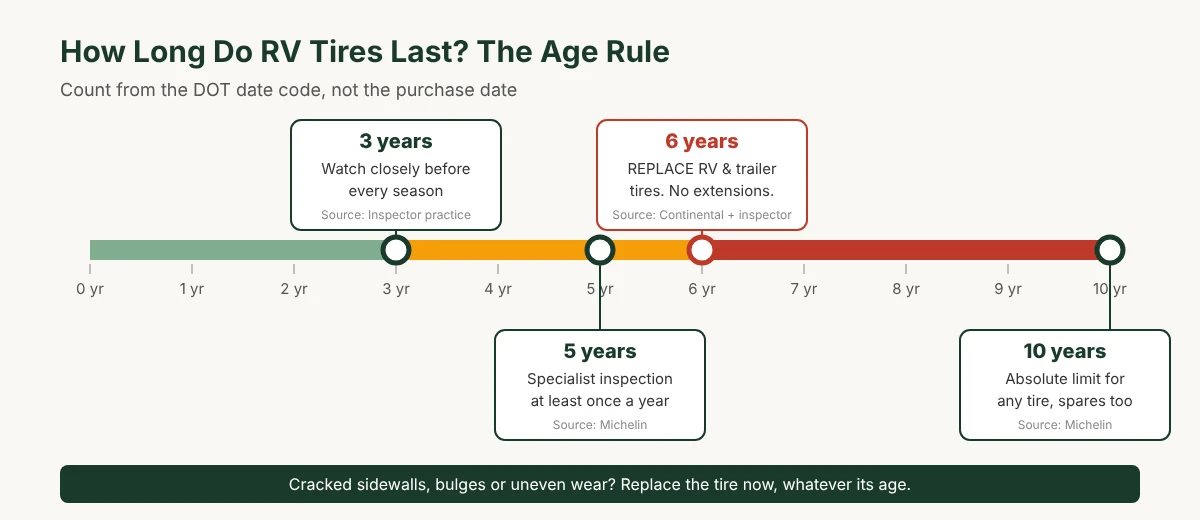
Class A motorhomes on heavy commercial tires follow the same 10-year ceiling, with annual inspections after five years. Whatever the age, a tire with cracked sidewalls, bulges or uneven wear is replaced on the spot.
Step 1: Read the Sidewall Before Anything Else
When I inspect a tire, I don’t start with the tread. I start by reading the sidewall, because everything that decides whether a tire is right for the vehicle is written there: its type, size, load capacity, speed rating and age. A tire can have perfect tread and still be the wrong tire.
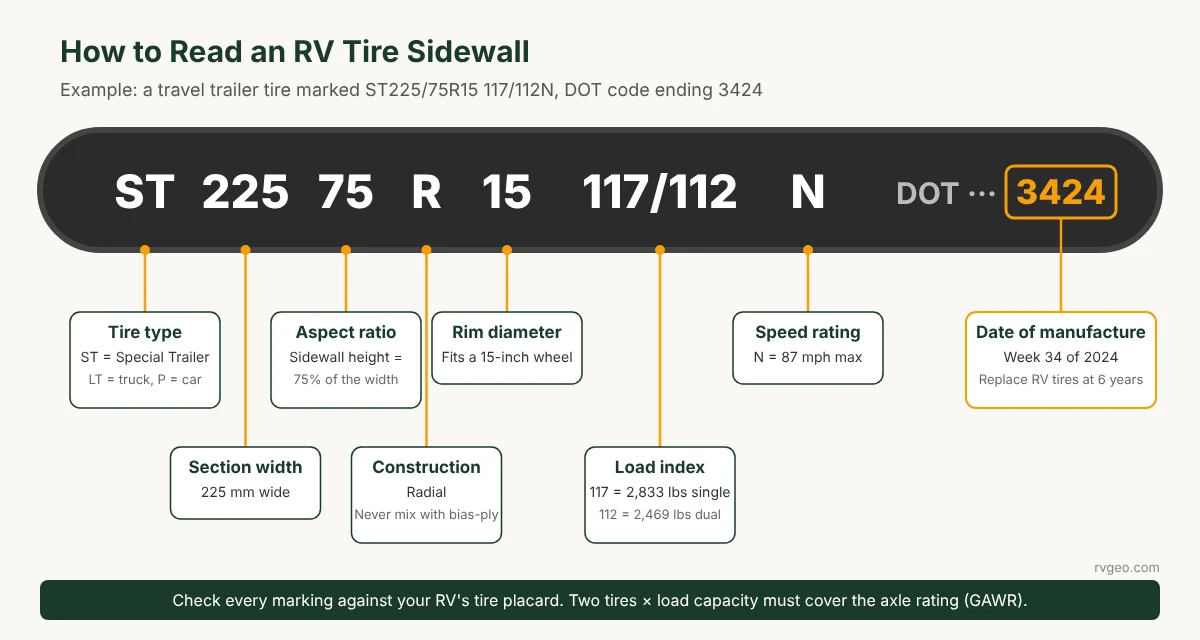
Here’s how to read a typical travel trailer tire marked ST225/75R15 117/112N, with a DOT code ending in 3424:
| Marking | Meaning | What to check |
|---|---|---|
| ST | Tire type: ST = Special Trailer, LT = Light Truck, P = Passenger car | The type matches the vehicle. No passenger-car (P) tires on an RV or trailer. |
| 225 | Section width in millimeters | Same size as the placard, same on both sides of the axle |
| 75 | Aspect ratio: sidewall height as a percentage of the width | Matches the placard |
| R | Radial construction | Same construction on both sides of the axle; never mix radial and bias-ply |
| 15 | Rim diameter in inches | Matches the wheel |
| 117/112 | Load index: a code for the maximum weight one tire can carry at its maximum pressure. 117 = 1,285 kg (2,833 lbs) as a single tire; 112 = 1,120 kg (2,469 lbs) per tire when fitted as duals | Equal to or higher than the minimum on the vehicle placard |
| N | Speed rating: N = 87 mph | Equal to or higher than the vehicle requirement |
| DOT …3424 | Date of manufacture: 34th week of 2024 | Compare with the age limits above |
What the load index means in pounds
The load index is the number most owners skip, and the one that matters most on a heavy RV. It isn’t a weight; it’s a code you look up in a standard table. These are the values you’ll meet on RV and trailer tires:
| Load index | Max. load per tire (kg) | Max. load per tire (lbs) |
|---|---|---|
| 100 | 800 | 1,764 |
| 105 | 925 | 2,039 |
| 110 | 1,060 | 2,337 |
| 112 | 1,120 | 2,469 |
| 115 | 1,215 | 2,679 |
| 117 | 1,285 | 2,833 |
| 120 | 1,400 | 3,086 |
| 121 | 1,450 | 3,197 |
| 123 | 1,550 | 3,417 |
| 125 | 1,650 | 3,638 |
Multiply by the number of tires and you get the most the tires can carry together. Four tires rated 117 on a tandem-axle trailer carry at most 4 × 2,833 = 11,332 lbs, and only at the tire’s maximum pressure. If your loaded trailer weighs close to that, the tires have no safety margin left.
The quick check I use on every axle: multiply the tire’s load capacity by two and compare it with the axle rating (GAWR) printed on the RV’s tire and loading placard. The two tires on an axle must together carry at least what the axle is rated for. A trailer axle rated at 5,200 lbs needs tires of at least 2,600 lbs each: a 117 (2 × 2,833 = 5,666 lbs) passes, a 112 (2 × 2,469 = 4,938 lbs) does not.
Then compare those markings with the tire and loading placard on your RV and with your owner’s manual. In inspection, the mismatches I flagged most often were a load index below the manufacturer’s minimum, a passenger-car tire fitted where a trailer or light-truck tire belongs, and different tire types or sizes on the same axle.
Then measure the tread depth
Once the sidewall checks out, measure the tread depth in the main grooves with a tread depth gauge, at several points across the tire. Every tire has tread wear indicator bars (marked “TWI” on the sidewall) molded into the bottom of the grooves. When the tread wears down to those bars, the tire must be replaced.
| Vehicle | Minimum tread depth | Rule |
|---|---|---|
| Travel trailers, Class C, camper vans (light vehicles) | 2/32 inch (1.6 mm) | Wear bars flush with the tread; the legal minimum in most states |
| Commercial trucks and buses: steer axle | 4/32 inch | FMCSA 49 CFR 393.75 |
| Commercial trucks and buses: other axles | 2/32 inch | FMCSA 49 CFR 393.75 |
The federal truck rules don’t apply to most private motorhomes, but on a Class A running heavy commercial tires, I’d use them as the benchmark. And don’t wait for the legal minimum on any RV: a heavy vehicle needs far more distance to stop on worn tires, especially in the wet.
The four-digit date code is the last line of that check. If the tire has passed the limits in the table above, the rest doesn’t matter. It’s molded right after the letters DOT, and on some tires only on the inside sidewall, so check both sides.
Step 2: Set Pressure for the Weight You Actually Carry
Start with the manufacturer’s values, not the sidewall. The number molded on the tire is the maximum pressure, not a target. The pressures that matter are on your RV’s tire and loading placard and in the owner’s manual, and they are rarely the same for every tire: manufacturers specify different pressures for the front and rear axles, and often different values for a loaded and an unloaded vehicle. That’s exactly what the gas station’s “one number for all four” gets wrong.
Loaded or unloaded: which value do you use?
On light vehicles (up to 3.5 tonnes, or about 7,700 lbs, such as camper vans and the tow vehicle itself), manufacturers base the two values on occupants. As a rule of thumb, one to three people on board counts as “normal” (unloaded), and four to five people with luggage counts as “fully loaded.” With an average of about 70 kg (155 lbs) per person, you can estimate where your load sits.
On a heavier RV, that occupant rule no longer works, because people are only part of the weight. Fresh water (about 8.3 lbs per gallon), propane, batteries, tools and gear often add more than the passengers do. So if you’re travelling with full tanks and a packed rig, use the loaded value, even with only two people aboard. A travel trailer carries no passengers at all, so judge it by its cargo and water.
On a car, the difference between unloaded and loaded is a few hundred pounds. On a heavy Class A, the gap between an empty coach and a fully loaded one can run to several tons, which changes the right pressure on each axle, the braking effort and fuel use.
Then refine for the weight you actually carry. On a heavy or fully loaded RV, the most accurate method is:
- Weigh the RV loaded for travel, ideally each axle end (left and right) separately.
- Find your tire’s load and inflation table from the tire manufacturer, matched to the exact size and load range on your sidewall.
- Use the heaviest end of each axle. Michelin’s RV guidance is to set every tire on an axle to the pressure required by the heaviest end of that axle.
Always set pressure cold
A tire’s pressure rises as it heats up on the road, so a hot reading and a cold reading are not compared against the same target. The manufacturer’s values are cold values.
- Cold means before you drive, or after no more than 2 to 3 km (1 to 2 miles) at low speed, such as the short run to the nearest air pump.
- If you’ve driven further, let the tires rest. NHTSA defines cold as not driven for at least three hours. In practice, I never adjust pressure after less than half an hour of rest, and the longer you wait, the more accurate the reading.
- Check the tolerance in your owner’s manual. Manufacturers state how many psi above or below the target are acceptable. A reading inside that range is correct; outside it, adjust.
- Never let air out of a hot tire to bring it down to the cold value. Once it cools, it will be under-inflated.
- Check two to three times a week while the RV is in use, and always before a travel day: cold, on every tire including inner duals and the spare. When the RV is parked, check at least once a month.
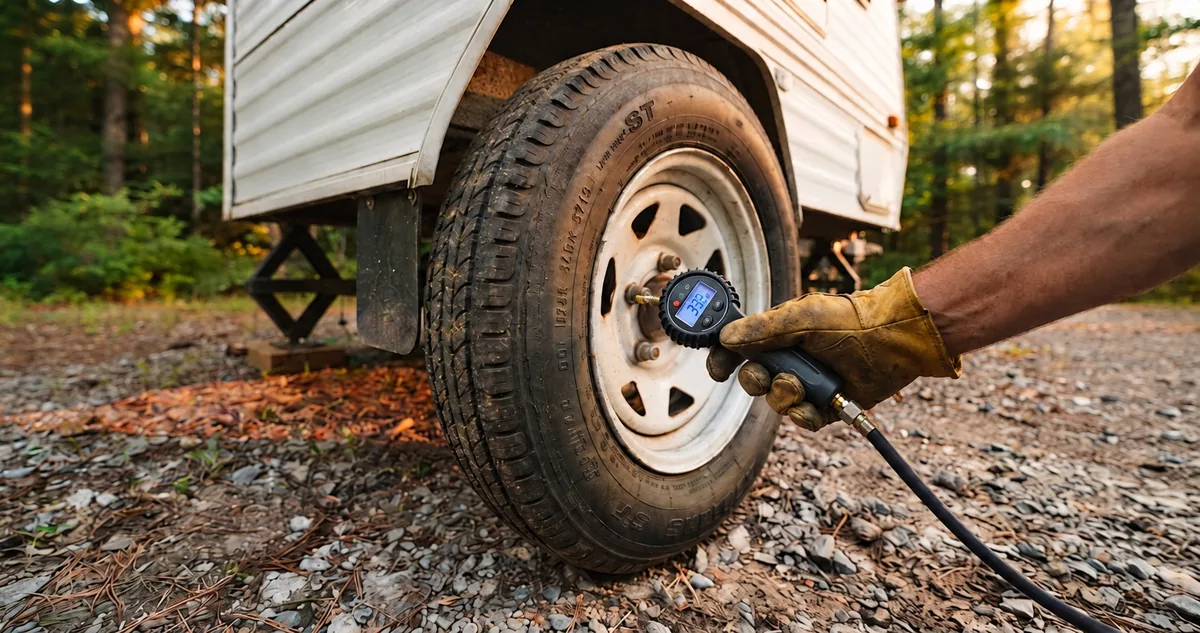
A digital gauge that reads to RV pressures and a 12V compressor rated for them turn this into a five-minute job before every trip.
Low pressure doesn’t only threaten the tire. It also raises rolling resistance, so you burn more fuel on every mile, and an RV already burns plenty.
RVGeo tool
How much is low tire pressure costing you in fuel?
Under-inflated tires roll harder, so you burn more fuel every mile. The Fuel Waste Calculator estimates the extra gallons and dollars low pressure costs you per year.
- Enter just 3 numbers: your MPG, fuel price and miles driven
- Get a realistic low-to-high range in about 30 seconds
- Excel calculator + quick guide and worked examples (PDF)
Get the calculator — $29 See how it works
One-time payment, instant download, 30-day refund if it doesn’t work as described. This is RVGeo’s own product. Results are estimates, not official measurements.
Step 3: Know What Kind of Tire You’re Running
Most travel trailers and fifth wheels leave the factory on ST (Special Trailer) tires. Motorhomes run LT (Light Truck) or commercial truck tires. The letters matter, because the two are designed and rated differently.
| Feature | ST (Special Trailer) | LT (Light Truck) |
|---|---|---|
| Built for | Free-rolling trailer axles | Steering, driving and braking vehicles |
| Traditional speed basis | 65 mph load formula unless speed-rated higher | Speed rating varies by tire |
| Load capacity at the same size | Generally higher | Generally lower |
| Where you see it | Travel trailers, fifth wheels, toy haulers | Class C, Super C, some trailers after an upgrade |
Same size doesn’t mean same tire
One trap I saw constantly in inspection: the same tire size exists in several categories. A 225/75R15 or a 235/85R16 can be a passenger tire, a light-truck tire for a pickup or van, a trailer tire, or a tire built for buses and other heavy-duty service. The numbers on the wheel fit, but the tire inside them is designed for a completely different load. That’s why size alone tells you nothing: check the type letters, the load index and the speed rating against your RV’s placard every time.
Never mix tire structures on the same axle
Two tires of different construction on one axle, such as a radial next to a bias-ply, or an ST next to an LT, was a reason to fail a vehicle in technical inspection. Their rolling circumference isn’t the same, even when the size on the sidewall is. One wheel turns slightly faster than the other, so the vehicle pulls, braking becomes unbalanced and the tires wear unevenly. Match the construction, size, type and load range across every axle.
The 65 mph point surprises a lot of owners. According to tire engineer Roger Marble, writing in RV Travel, the industry load formula for ST tires is based on a 65 mph maximum operating speed. Newer ST tires carry higher speed symbols, but highway speed still means more heat.
Should you switch a trailer to LT tires? Sometimes, but not blindly. Load capacity, wheel rating and the trailer maker’s approval all have to line up.
Step 4: The Pre-Trip Tire Check (and What It Can’t Replace)
A tire inspection is never just about the tread. The tire, the wheel, its fasteners, the balancing, the alignment, the inflation, the suspension joints, the tire’s age and its size all affect each other. A worn tire is often the symptom; the cause is somewhere else. That’s why a professional inspector combines a visual check with tools and machines that measure what the eye can’t see.
What you can check yourself in 10 minutes
With a pressure gauge, a tread depth gauge, a torque wrench and a flashlight, check before every trip:
- Pressure, cold, on every tire, including inner duals and the spare, against the manufacturer’s values.
- Sidewalls: cracks, bulges, cuts and curb scuffs.
- Tread depth and wear pattern: above the wear bars, and worn evenly across the width (see the wear pattern table above).
- Matching tires on each axle: same size, construction, type and load range on both sides.
- Wheels: cracks, dents or bends in the rim, especially after hitting a curb or pothole.
- Fasteners: rust streaks or shiny marks around lug nuts suggest a loose nut. Torque them to the manufacturer’s value after any wheel work.
- Valve stems and caps: rubber stems crack with age; extenders on duals must be secured.
- Date codes: note them once, and compare them with the age limits above.
What only a shop can measure
Some faults can’t be judged by eye. They need an alignment rig, a wheel balancer or a play detector. Have a professional measure them once or twice a year depending on how much you use the RV, and also after fitting new tires, after a hard impact, or whenever the tread shows one of these patterns:
| What you see on the tire | What the shop should check |
|---|---|
| Wear on one edge only, or a feathered tread | Wheel alignment (toe and camber) |
| Patchy or cupped wear, vibration at speed | Wheel balancing, shock absorbers |
| Irregular wear that returns after alignment | Play in ball joints, tie rods and suspension bushings |
| Vehicle pulls to one side | Alignment, mixed tires on the axle, uneven pressure, brakes |
This tire check slots straight into our pre-purchase RV inspection checklist if you’re shopping for a used rig. The measuring tools are in our guide to the inspection tools worth owning.
Step 5: Monitor Tires While You Drive
A pre-trip check tells you how your tires were when you left. A tire pressure monitoring system (TPMS) tells you how they are at mile 140, when a slow leak or a dragging brake starts heating a tire you can’t see from the driver’s seat.
Most RVs don’t have one from the factory
Federal safety standard FMVSS 138, which grew out of the TREAD Act, has required TPMS on new passenger cars, SUVs, pickups and vans since September 2007. But it only covers vehicles with a gross vehicle weight rating of 10,000 lbs or less, and it excludes vehicles with dual wheels on an axle. Your tow vehicle probably has TPMS. Your travel trailer, fifth wheel or heavier motorhome very likely doesn’t, so you’ll need an aftermarket system with sensors on the valve stems.
State safety inspections rarely help here. Requirements vary from state to state, and according to Tire Rack’s state-by-state summary, only a handful of states, including Hawaii, Rhode Island, Vermont and West Virginia, fail a vehicle for a TPMS fault.
Pressure and temperature: why both matter
Good RV systems read pressure and temperature in real time. The temperature alert is the one that saves trailers: a dry or failing wheel bearing, or a dragging brake, generates heat that passes through the hub and wheel into the tire. Caught early, it’s a stop at the next exit. Missed, it can end in a destroyed tire or a wheel fire on the interstate.
Three TPMS traps to avoid
- “Set it and forget it.” A TPMS doesn’t replace the cold check with a gauge. It warns you about change; it doesn’t tell you the starting pressure was right.
- Signal range. On a long trailer or a motorhome towing a car, the rear sensors are far from the monitor. Without a signal booster, readings drop out exactly when you need them.
- Sensor batteries and relearning. External sensors run on small batteries that need replacing, and factory systems on tow vehicles often need a relearn procedure after a tire rotation or sensor change.
Why Trailer Tires Blow Out
When I looked at tires after a blowout, the root cause was almost always the same: prolonged under-inflation. A soft tire sags, and its sidewalls flex too much on every rotation. That constant flexing generates heat inside the tire until the bonds between the rubber and the steel belts break down and the plies separate. Often a hard hit on a curb or pothole had already weakened the casing.
From what I saw in inspection, the causes rank like this:
- Under-inflation or the wrong pressure: the direct cause of overheating.
- Overload: it multiplies the effect of low pressure.
- Impacts: curbs and potholes damage the casing invisibly.
- Age: hardened rubber, especially on rigs that sit in the sun.
Hidden weakness shows up under stress
One thing an inspection lane teaches you: a weak tire can look fine until it’s put under load. I’ve seen the tread of a retreaded tire peel away from its casing on the brake-testing rollers, like a zipper opening, because the bond between the new tread and the old casing had quietly failed. A long, hot highway day does the same job as those rollers, only at 65 mph.
Why cheap tires fail first
Budget tires chosen only for their price, including some of the stock tires fitted to new trailers, usually have less protection in the sidewall and lower heat resistance. They handle overload badly, cut easily on curbs, and are the first to delaminate on long summer drives. On RV owner forums, failing stock trailer tires are nicknamed “China bombs.”
The damage goes beyond the tire
I’ve seen plenty of vehicles after a real highway blowout, especially heavy trucks and semi-trailers. The tread acts like a flail inside the wheel well: wheel-well liners and mud flaps torn off, light wiring cut, body panels crumpled, and sometimes damage to the vehicles following behind. On a trailer, add holding-tank plumbing and underbelly material to that list.
Check how your policy treats blowout damage with our explainer on RV insurance coverage types.
RV Tire Replacement: What to Buy
Replace all four tires if you can
On a tandem-axle trailer or RV, replacing every tire at once is the gold standard. Tires of the same age and wear handle predictably and share the load evenly. If the budget only covers one axle, keep the two new tires together on the same axle, matched in size, construction and load range, and mount them on the rear axle. Michelin generally recommends putting new tires at the rear, because deeper tread there gives better grip in the wet and reduces the risk of losing stability. On a tandem trailer, the rear axle also takes the most scrubbing in tight turns.
Never fit retreads to an RV
My answer here is a hard no. Retreaded tires are built for commercial fleets, where casings are professionally managed and maintenance is tightly monitored. An RV sits parked for months in the sun, then runs loaded at highway speed: exactly the conditions that expose a weak bond between the new tread and the old casing, as I saw on the brake-testing rollers. Fit new tires only: quality ST trailer tires, or LT tires where they’re approved.
Check the date on “new” tires before they’re mounted
A tire starts aging the day it’s made, not the day it’s sold. Before installation, read the four-digit DOT date code on every new tire. My rule: don’t accept a “new” tire made more than one to two years earlier, and only if it was stored indoors, away from sunlight and ozone. If the shop offers older stock, ask for a fresher batch or buy elsewhere.
The basics of a correct replacement
- Match or exceed the original load index and speed rating.
- Never mix constructions, sizes or load ranges on one axle.
- Check that your wheels are rated for the pressure the new tires need.
- Have the new tires balanced, and torque the lug nuts to the manufacturer’s value.
For trailers, the ST shortlist most owners end up comparing includes the Goodyear Endurance, the Sailun S637 and the Carlisle Radial Trail HD. They differ in speed rating, available load ranges and price.
Storing Your RV Without Ruining the Tires
Storage is where RV tires lose the most life. The two real killers are immobility and UV. A heavy rig parked on the same spot for months crushes the casing in one zone and leaves flat spots, while sunlight and ozone dry out the sidewalls until they crack, long before the tread wears.
Cover the tires and lift them off bare ground
Fit UV-blocking tire covers whenever the RV is parked for more than a few weeks. Then put a barrier under each tire, such as rubber pads, plastic blocks or wooden boards wider than the tread. Bare ground keeps the tire damp from below, and asphalt can contain oils that are hard on rubber over long periods.
Store them slightly over-inflated
Tires lose air slowly even when they sit still, often a pound or two a month, and cold weather lowers pressure further. My practice is to set them about 10 to 15% above the normal cold pressure before storage, never above the maximum molded on the sidewall or the wheel’s limit. That margin keeps them from drifting into under-inflation while they carry the parked weight. Bring them back to the manufacturer’s value before the first trip.
Take the weight off, without stressing the chassis
For long storage, supporting the frame on jack stands rated for the RV’s weight takes most of the load off the tires and prevents flat spots. Two warnings: don’t use hydraulic leveling or stabilizer jacks for this, since they aren’t designed to carry the rig for months; and don’t lift so high that the suspension hangs at full extension for the whole season, which strains rubber-based components such as torsion axles. Support the frame evenly, keep the chassis level, and if the RV stays on its wheels, move it every month or two so the same patch of rubber isn’t loaded all season.
UV is also hard on roofs, seals and decals, as we cover in what sun and heat damage first on an RV.
RV Tire Checklist at a Glance
| When | Check | Who / tool |
|---|---|---|
| Two to three times a week in use, and before every travel day | Cold pressure on every tire, against the manufacturer’s values | You, with a pressure gauge |
| Before every trip | Sidewalls, tread depth and wear pattern, matching tires per axle, wheels, lug nuts, valve stems | You, with a tread gauge, torque wrench and flashlight |
| While driving | Pressure and temperature alerts | TPMS |
| Once or twice a year, and after an impact | Alignment, balancing, ball joints, bushings, shock absorbers | A shop with measuring equipment |
| Every season | Date codes against the age limits (closer watch from 3 years, specialist check from 5, replace at 6, never beyond 10) | You |
| At every tire purchase | Type, size, load index, speed rating, date code under 1 to 2 years | You and the tire shop |
| In storage | Covers on, pads under the tires, slightly over-inflated, weight relieved or RV moved periodically | You |
RV Tire FAQ
How long do RV tires last?
Michelin says tires in service for five years or more should be inspected by a specialist every year and replaced at 10 years at the latest. Continental recommends replacing motorhome, caravan and trailer tires after six years. As an inspector, I treat six years as the hard limit for RVs and trailers and start watching them closely from year three.
What PSI should my RV tires be?
Use the cold pressures on your RV’s tire placard and in the owner’s manual, which often differ between the front and rear axles and between loaded and unloaded. On a heavy or fully loaded RV, refine them with real axle weights and the tire maker’s load and inflation table. Never use the sidewall maximum as a target.
What is the most common cause of RV tire blowouts?
Prolonged under-inflation. A soft tire flexes and overheats until its internal layers separate. Overload, impacts against curbs and potholes, and age all make it worse.
Do I need a TPMS on my RV?
Federal TPMS rules only cover light vehicles of 10,000 lbs or less without dual wheels, so most trailers and heavy motorhomes have none from the factory. An aftermarket TPMS with pressure and temperature alerts is the best early warning you can add.
Should I replace all RV tires at once?
Ideally, yes. If you can only replace two, keep them as a matched pair on the same axle and put the new ones on the rear axle.
Are retreaded tires safe on an RV?
I don’t recommend them. Retreads are built for professionally managed commercial fleets. On an RV that sits for months and then runs loaded at highway speed, the risk of the tread separating is too high.
The Bottom Line
RV tires are a system, not just tread. Read the sidewall, respect the manufacturer’s pressures, check them cold and often, have the alignment and balancing measured, replace on age, and protect the tires when the RV sits. Do that and you remove most of the reasons RV tires fail.
Start with the three checks that prevent most failures: the date code, the cold pressure against the manufacturer’s values, and a TPMS for the road. To see what under-inflation costs you at the pump, try the RVGeo Fuel Waste Calculator. And if you’re still deciding which RV to buy, read the RV mistakes that cost owners the most first.

Published on October 16, 2026
Mike Dawson
Mike Dawson is RVGeo's lead editor, applying inspection-grade rigor to RV research - verifying manufacturer specs, testing components, and fact-checking pricing and claims before they're published. RVGeo's approach draws on a background in automotive technical inspection, applied specifically to RV electrical, power, and safety systems. Mike oversees RVGeo's foundational guides on power systems, DIY conversions, and van-life setup, with every recommendation checked against real specs and current pricing rather than assumptions.
This post contains affiliate links. If you make a purchase through these links, we may earn a commission at no extra cost to you.