Author
How to Upgrade Your RV from Lead Acid to Lithium Batteries (Complete Step-by-Step Guide)
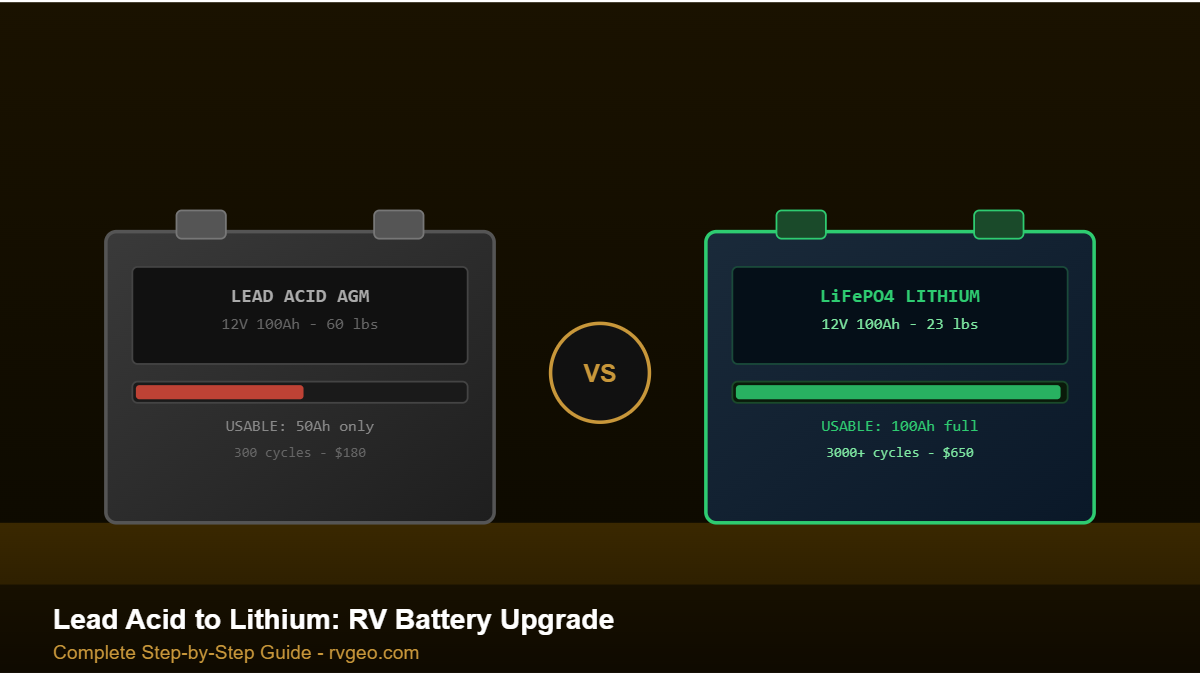
Switching from lead acid to lithium is the single biggest upgrade you can make to your RV power system. You get double the usable capacity, half the weight, faster charging, and a battery that lasts 3–5× longer. This guide walks you through every step — from choosing the right lithium battery to wiring it safely and updating your charging system.
Lead Acid vs Lithium: What You’re Actually Gaining
| Lead Acid (AGM) | LiFePO4 Lithium | |
|---|---|---|
| Usable capacity | 50% (100Ah AGM = 50Ah usable) | 80–100% (100Ah LiFePO4 = 80–100Ah usable) |
| Weight (100Ah) | 60–70 lbs | 25–30 lbs |
| Lifespan | 300–500 cycles | 3,000–5,000 cycles |
| Charge speed | Slow (max 25% of capacity) | Fast (up to 100% of capacity) |
| Self-discharge | 3–5% per month | 1–3% per month |
| Cost upfront | $150–250 per 100Ah | $350–700 per 100Ah |
| 10-year total cost | $600–1,000 (3 replacements) | $350–700 (one battery lasts) |
Before You Buy: 4 Things to Decide First
1. How much capacity do you need?
With lithium, you’re getting roughly double the usable capacity per amp-hour compared to AGM. If you had 200Ah of AGM (100Ah usable), replacing with 100Ah of lithium gives you the same usable capacity at half the weight. Most RVers either match their old capacity or upsize to enjoy the full lithium advantage.
Use our RV Battery Bank Sizing Guide to calculate your exact daily consumption and right-size your new lithium bank.
2. What voltage system do you run?
- 12V system: Most RVs — one 12V lithium battery or multiple in parallel
- 24V system: Some larger motorhomes — two 12V batteries in series, or one 24V lithium
- 48V system: Rare in RVs, more common in off-grid homes
3. Does your converter/charger support lithium?
This is the most overlooked step. Most stock RV converters were designed for lead acid and charge at voltages that are either too low (leaving lithium at 80%) or use a float stage that lithium batteries don’t need. Check your converter model — if it doesn’t have a lithium or LiFePO4 mode, you’ll need to replace or reprogram it.
4. Do you have a solar system to update?
If you have solar, your MPPT charge controller likely needs to be set to a LiFePO4 charge profile. Most modern Victron, Renogy, and Epever controllers support this in settings — no hardware change needed, just a configuration update.
Step 1 — Choose Your Lithium Battery
For RV use, LiFePO4 (lithium iron phosphate) is the correct chemistry — not the lithium-ion found in laptops and phones. LiFePO4 is thermally stable, does not catch fire, and handles the charge/discharge cycles of RV use reliably.
Recommended Batteries by Budget
- Battle Born 100Ah 12V ($949): The original RV lithium battery — 10-year warranty, heated version available for cold climates, excellent support
- Renogy 100Ah 12V LiFePO4 ($399): Best value, built-in BMS, reliable performance, good for first-time lithium buyers
- Dakota Lithium 100Ah ($699): 11-year warranty, performs well in cold temps, strong reputation in the fishing and overlanding community
- Ampere Time 200Ah ($549): Best value for high-capacity needs — 200Ah at a price that competes with 100Ah premium brands
Must-Have Feature: Built-in BMS
Every lithium battery you buy for an RV must have a built-in Battery Management System (BMS). The BMS protects against overcharge, over-discharge, short circuit, and over-temperature. All the batteries listed above include a BMS. Do not buy a bare lithium cell without one.
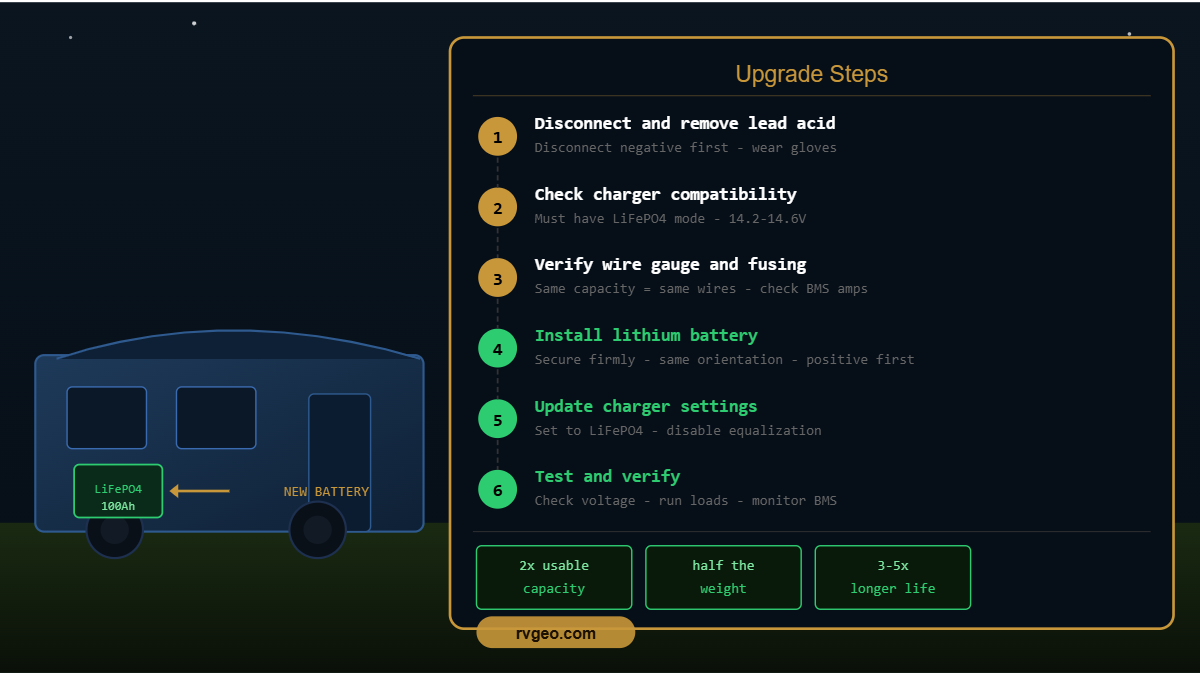
Step 2 — Remove Your Old Batteries
- Disconnect all loads and charging sources first
- Disconnect the negative terminal first, then positive
- Note the battery orientation and terminal positions before removing
- AGM batteries are heavy (60–70 lbs each) — have help or use a battery strap
- Dispose of old lead acid batteries at an auto parts store — they accept them free and recycle properly
Step 3 — Update Your Converter/Charger
Your RV’s built-in converter charges the house battery from shore power. Most stock converters (Progressive Dynamics, Parallax, WFCO) can be updated:
- Progressive Dynamics PD9200 series: Install the Charge Wizard pendant — allows switching to a lithium-compatible charge profile without replacing the unit
- WFCO converters: Most cannot be updated — replace with a lithium-compatible unit like the Progressive Dynamics PD9270 ($180) or Victron Blue Smart charger
- If replacing: The Progressive Dynamics PD9270ALV is the most popular drop-in replacement with a proper LiFePO4 charge profile built in
Lithium charge voltage: 14.2–14.6V absorption, 13.6V float (or no float — lithium prefers to not float). Do not use a charger that charges to 14.8V+ without lithium mode.
Step 4 — Update Your Solar Charge Controller Settings
If you have solar:
- Access your MPPT controller settings (via display or app)
- Change battery type from AGM/Sealed to LiFePO4
- Verify absorption voltage is set to 14.2–14.4V
- Set float to 13.5–13.6V (or disable float if your controller allows)
- Set low voltage disconnect to 11.5V (BMS will protect below this, but setting it conservatively is good practice)
Step 5 — Install the Lithium Battery
- Place the battery in the same compartment as your old batteries
- Connect positive terminal first, then negative
- Check that all connections are tight — loose connections cause heat and voltage drop
- Verify the battery orientation matches any venting requirements (lithium batteries don’t gas, but compartment airflow is still good practice)
- Turn on your battery monitor and verify the state of charge reads correctly
Step 6 — Update Your DC-DC Charger (If You Have One)
If you charge from your vehicle alternator via a DC-DC charger, update the output profile to LiFePO4 in the charger settings. Most modern DC-DC chargers (Renogy DCC50S, Victron Orion-Tr) support lithium profiles — consult your manual for the exact steps.
Common Mistakes to Avoid
- Mixing lithium and lead acid batteries: Never connect a lithium battery in parallel with a lead acid battery. The different charge profiles damage both batteries.
- Not updating the converter: Charging lithium at lead acid voltages undercharges them and reduces capacity. Always update or replace the converter.
- Buying lithium without a BMS: Bare lithium cells without a BMS can be dangerous. Always verify BMS is included.
- Undersizing the fuse: Lithium batteries can deliver enormous current. Install an appropriately rated fuse (typically 200A for a 200Ah bank) between the battery and main bus.
- Forgetting the temperature cutoff: LiFePO4 batteries should not be charged below 32°F (0°C). In cold climates, buy a battery with built-in heating (Battle Born, Renogy with heater) or install an external battery heater.
What to Expect After the Upgrade
- First charge: Charge to 100% slowly using shore power before your first use — this balances the cells
- Weight difference: You’ll immediately notice the reduced weight — significant in tow vehicles
- Capacity: Your battery monitor will now show accurate state of charge — lithium’s flat discharge curve makes this much more reliable than with lead acid
- Charging speed: Expect to charge 2–3× faster from solar and shore power — lithium accepts charge at much higher rates than AGM
Total Cost Estimate
| Component | Budget | Premium |
|---|---|---|
| 100Ah LiFePO4 battery | $399 (Renogy) | $949 (Battle Born) |
| Converter update/replacement | $0 (settings only) | $180 (new PD9270) |
| Battery monitor upgrade | $40 (Renogy shunt) | $120 (Victron BMV) |
| Wiring/fuse update | $30 | $60 |
| Total | ~$469 | ~$1,309 |
Frequently Asked Questions
Can I replace my AGM batteries with lithium one-for-one?
Yes — a 100Ah LiFePO4 installs in the same space as a 100Ah AGM, uses the same terminal connections, and weighs half as much. The only required changes are to your charging sources (converter, solar controller, DC-DC charger) to use the correct charge profile.
How long will a lithium RV battery last?
Quality LiFePO4 batteries are rated for 3,000–5,000 charge cycles — 8–15 years of daily use. Battle Born and Dakota Lithium both offer 10-year warranties. This compares to 2–4 years for AGM under similar use conditions.
Is lithium safe in an RV?
LiFePO4 chemistry is the safest lithium chemistry available. Unlike lithium-ion (used in phones and laptops), LiFePO4 does not catch fire or explode under normal abuse conditions. It’s the correct and safe choice for RV applications.
Do I need to vent my battery compartment with lithium?
LiFePO4 batteries do not off-gas during normal charging, unlike flooded lead acid. Venting is not required for safety, but good airflow in the compartment helps temperature management.
See Also
- Lithium vs AGM RV Battery: Which Is Right for Your Setup?
- How to Size Your RV Battery Bank: Step-by-Step Guide
- How Long Can You Boondock on RV Batteries?
- RV Solar Panel Sizing Guide: How Many Panels Do You Really Need?
- RV Power System Setup: Complete Guide for Vans and RVs
Published on May 22, 2026
Mike Dawson
Mike Dawson is RVGeo's lead editor, applying inspection-grade rigor to RV research - verifying manufacturer specs, testing components, and fact-checking pricing and claims before they're published. RVGeo's approach draws on a background in automotive technical inspection, applied specifically to RV electrical, power, and safety systems. Mike oversees RVGeo's foundational guides on power systems, DIY conversions, and van-life setup, with every recommendation checked against real specs and current pricing rather than assumptions.
This post contains affiliate links. If you make a purchase through these links, we may earn a commission at no extra cost to you.