Author
when things go wrong at 2am in 15°F weather
january 2022, caballo lake, new mexico. 2:17am. i woke up to silence. no furnace hum. no diesel heater fan. nothing. rv interior: 48°F and dropping. outside: 15°F.
i had 90 minutes to diagnose and fix whatever failed before interior temp dropped to genuinely dangerous levels. i fixed it in 34 minutes (dead low-voltage cutoff, reset in 30 seconds once i found it). but those 34 minutes required knowing exactly where to look and what to check.
winter rv equipment failures follow predictable patterns. the same five problems account for 90% of cold-weather breakdowns. this guide gives you the diagnostic steps and fixes for each one so you can solve them fast, not learn them the hard way at 2am.
for the full winter preparation system that prevents most of these failures in the first place, our winter boondocking survival guide covers gear setup, battery sizing, and insulation from the beginning.
problem 1: furnace won’t start or stops mid-cycle
symptoms
furnace clicks but no ignition: you hear the thermostat call for heat, the blower starts, the igniter clicks 3-5 times, then everything shuts off. rv stays cold. cycle repeats every 3-5 minutes.
furnace starts then shuts off after 30-90 seconds: blower runs, brief heat, then furnace shuts down. short-cycling.
furnace runs continuously but rv won’t warm up: furnace runs non-stop but interior temperature won’t reach thermostat setpoint.
diagnostic steps
check 1: propane supply (5 minutes)
go outside, check propane tank gauge. below 20% reading can cause pressure problems in cold weather (propane doesn’t vaporize well at low pressure when tanks are nearly empty and cold).
try this: close tank valve, wait 30 seconds, reopen slowly. sometimes pressure regulator resets. if furnace starts and runs normally, low pressure or stuck regulator was the issue.
if tank is below 20%, this is your problem. refill immediately.
check 2: furnace air filter (5 minutes)
dirty air filter is the single most common cause of furnace short-cycling. find your furnace access panel (usually inside a cabinet or exterior compartment door). remove filter (foam or fiberglass pad). hold it up to a light. if you can’t see light through it, it’s dirty.
clean foam filters: rinse with water, squeeze dry, reinstall. replace fiberglass filters ($8-12 at rv supply stores). furnace should run normally after cleaning.
check frequency: every 2-4 weeks during winter. dusty locations (quartzsite) require weekly checking.
check 3: exhaust vent blockage (5 minutes)
go outside with a flashlight. find the furnace exhaust vent (small rectangular vent on rv exterior wall, usually near floor). check for snow, ice, mud dauber nests, or debris blocking the vent.
blocked exhaust triggers the high-limit safety switch, shutting furnace down after 60-90 seconds. this looks identical to a failing high-limit switch. clear the blockage first before assuming switch failure.
ice blockage: warm rv interior to 60°F+ and wait for ice to melt. or carefully remove ice with wooden dowel (not metal, don’t damage vent screen). never cover exhaust vent with anything.
check 4: igniter condition (10 minutes)
if propane supply is good, filter is clean, and exhaust is clear, the igniter may be failing. igniters wear out after 3-5 years of normal use, faster in dusty or humid environments.
test: remove furnace access panel. locate igniter (small ceramic tip near burner). turn on furnace and watch igniter. it should glow orange within 15-20 seconds. if it glows weakly or not at all, it’s failing.
replacement: suburban igniters cost $22-35 at camping world or amazon. atwood igniters cost $18-28. installation: disconnect wires, unscrew igniter, reverse process for new one. 20-minute job.
check 5: high-limit switch (15 minutes)
high-limit switch is a safety device that shuts furnace off if heat exchanger overheats. it resets automatically when temperature drops, which creates the pattern of: furnace runs 60-90 seconds, shuts off, waits 5 minutes, tries again.
causes of high-limit tripping: dirty filter (check first), blocked registers (are all heat vents open?), failing blower motor (not moving enough air).
test blower: put your hand at a heat register when furnace starts. you should feel strong airflow within 5 seconds. weak airflow = blower motor failing.
blower motor replacement: $55-90 part, 2-3 hour DIY job. suburban and atwood parts available at camping world and amazon. if you’re not confident with this repair, this is the one to call a technician for.
high-limit switch replacement itself: $15-25, 45-minute DIY job. only replace it after confirming airflow is adequate (otherwise new switch trips again immediately).
emergency fallback if furnace can’t be fixed
backup heat sources to deploy immediately while diagnosing furnace:
diesel heater: if already installed, switch to diesel immediately. most winter boondockers should have diesel heater as primary heat anyway (see our [diesel vs propane rv heating guide]).
electric space heater: 1,500W ceramic heater connected to generator. run generator outside (minimum 10 feet from rv, exhaust directed away). provides immediate heat while diagnosing furnace.
catalytic heater: mr heater buddy ($70-90) operates on 1-lb propane cylinders or with adapter hose to main tank. produces 4,000-9,000 BTU. safe for indoor use (oxygen depletion sensor shuts it off if oxygen drops). adequate for emergency heating in most rvs.
oven for heat (controversial): propane rv oven can raise interior temperature in emergency. open oven door, set to 350°F. this burns propane but works. caution: increases CO risk, ensure CO detector is working, crack a window 1 inch. use only as short-term emergency measure.
problem 2: frozen water lines
symptoms
no water flow when pump runs: pump activates when you turn on faucet, you hear it running, but nothing comes out. or flow starts then stops abruptly.
pump runs constantly without building pressure: pump runs but pressure gauge doesn’t rise. water flowing somewhere other than faucet (check under sinks for burst pipe).
no flow from one faucet only: isolated freeze at that fixture. other fixtures work normally.
immediate diagnosis (10 minutes)
identify which section is frozen
test each fixture in order: kitchen faucet hot, kitchen faucet cold, bathroom sink hot, bathroom sink cold, toilet, outside shower (if equipped). record which work and which don’t. this tells you where the freeze is.
all fixtures frozen: freeze is on supply line before distribution, likely at inlet where hose connects to rv or at water pump itself.
one fixture frozen: freeze is at that fixture’s supply line, usually the line running to an exterior wall.
hot water only frozen: water heater supply line or hot water lines in poorly insulated area.
check outside first
look at water hose connection point at rv inlet. this is the most common freeze point. is hose disconnected or ice-blocked? is the heated hose working (should feel warm to touch)? is there ice at the rv inlet connection?
locate freeze inside rv
open cabinet doors under all sinks. feel supply lines (small diameter pipes under sink). frozen section feels rigid and solid versus flexible when unfrozen. you can often see frost on frozen sections if interior temp has been below 32°F.
thawing frozen lines safely
method 1: raise interior temperature (best method)
set furnace or diesel heater to 75-80°F. open all cabinet doors under sinks. if heated basement is accessible, open access panels. wait 2-4 hours. lines typically thaw progressively as interior warms.
patience required: water will flow again before all ice is gone. once flow resumes, run each faucet for 5 minutes to clear remaining ice.
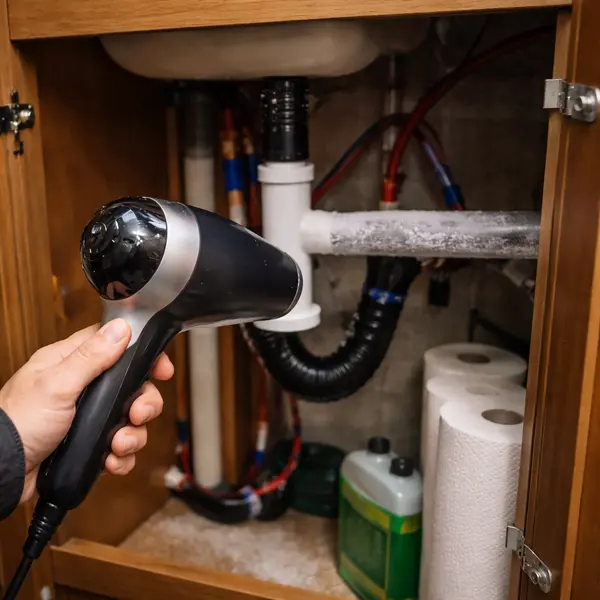
method 2: hair dryer on accessible sections (faster but limited)
if you can physically reach the frozen section, hair dryer on medium heat (not high, avoid thermal shock to pipes) applied directly to frozen section works well. move dryer continuously, don’t hold on one spot.
works for: pipes under sink, water pump area, visible supply lines. doesn’t work for: pipes inside walls, pipes under rv floor, lines in inaccessible spaces.
method 3: heated water bottle (emergency)
fill hot water bottle (or regular water bottle with hot water from kettle). hold against frozen section for 10-15 minutes. slower than hair dryer but works when no electricity available.
after thawing: inspect for damage
frozen pipes often crack at the freeze point but don’t leak until thawed. after water flow resumes, check every connection and fitting for drips. common failure points: threaded fittings at fixture connections, elbow joints where pipe changes direction, any area with previous repair work.
repair leaks immediately. even small drip becomes significant water damage over days.
pex tubing (used in most modern rvs) is more freeze-tolerant than rigid pvc or copper. pex expands instead of cracking. if you have pex, frozen sections often thaw without damage. if you have older rigid pipe, expect higher rate of post-thaw leaks.
prevention after first freeze
you already know your rv’s weak points now. protect them:
pipe insulation foam: $8 for 6-foot section at home depot. split lengthwise and wrap around vulnerable sections, secure with zip ties.
heat tape: self-regulating heat tape ($20-35 for 6-foot section) wrapped around vulnerable pipes and plugged into 12V or 120V. draws 3-7 watts per foot. effective to -40°F. install on pipes that froze and any others near exterior walls.
cabinet door policy: during temperatures below 32°F, leave cabinet doors under all sinks open overnight. warm rv air circulates to pipes.
problem 3: battery won’t charge
symptoms
solar controller shows charging (green light, shows voltage output) but battery voltage doesn’t increase.
battery voltage drops steadily despite solar running.
batteries drain to cutoff overnight and won’t recover next day.
diagnostic steps
check 1: battery temperature (2 minutes)
touch battery case. if it feels cold (below 40°F), this is your problem for both AGM and lithium.
AGM: won’t accept charge below -4°F. charge acceptance severely reduced 0-32°F. lithium: BMS blocks charging below 32°F completely.
fix: battery warming pad. 30-60 minutes at 50-80W raises AGM battery from 20°F to 40°F. once battery temp above 40°F, charging resumes normally.
temporary fix if no warming pad: run generator. generator produces heat. if battery is in engine compartment or adjacent space, generator heat raises battery temp passively within 1-2 hours.
check 2: solar panel output (5 minutes)
look at panels. snow? even thin layer of snow drops output 80-90%. clear panels with soft brush (not metal scraper).
check solar controller display: showing watts input? if showing 0W despite visible sun, check panel connections. common failure: connector corroded by moisture, vibration loosened terminal at controller.
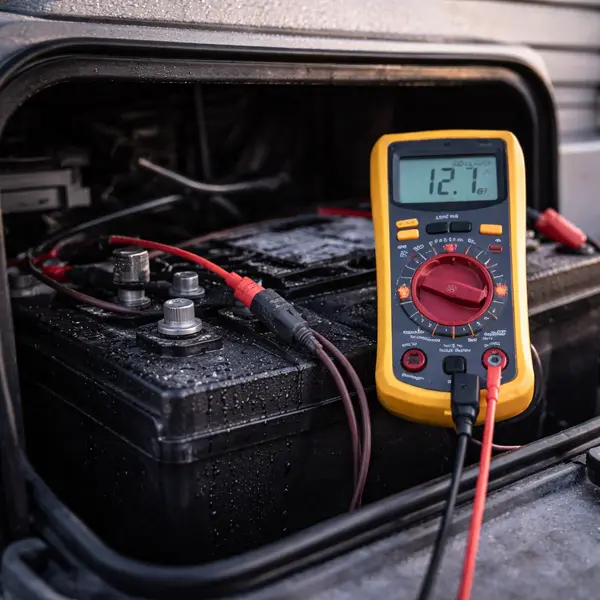
check 3: battery state of health (10 minutes)
connect voltmeter directly to battery terminals (not at controller, at battery itself). fully charged AGM: 12.6-12.8V. fully charged lithium: 13.2-13.4V.
if battery reads below 10.5V (AGM) or below 10V (lithium), it may be sulfated or damaged beyond recovery. charge with dedicated battery charger (not solar controller) at slow rate for 8-12 hours. if voltage still won’t rise above 11V, battery is failed and requires replacement.
check 4: connections and fuses (10 minutes)
loose connection between battery and solar controller causes intermittent charging. check all terminals: battery positive and negative to controller, controller to panels. terminals should be tight with no corrosion (white or blue powder indicates corrosion).
clean corrosion: baking soda + water paste applied with old toothbrush, rinse with water, dry thoroughly, reconnect.
check inline fuses between battery and controller. blown fuse = no charging. replacement fuses: $5-8 at auto parts store.
emergency battery management when charging fails
if you cannot restore charging, manage remaining battery to last as long as possible:
prioritize loads: furnace fan and diesel heater fan are non-negotiable. everything else is optional. disconnect: refrigerator (move food to cold box outside, food stays cold naturally), water pump (fill water bottles for drinking), entertainment electronics, phone charging (charge from tow vehicle).
generator backup: run generator 2-4 hours to recharge batteries. at 120V input, smart charger refills 200Ah bank in 3-4 hours. keep generator fuel reserve specifically for battery emergencies.
problem 4: generator won’t start in cold
symptoms
engine cranks normally but won’t fire: starter motor turns engine over but no ignition.
engine fires briefly then dies: starts for 3-5 seconds, then stalls.
engine won’t crank at all: no response when you pull start or press electric start.
diagnostic steps
check 1: choke position (1 minute)
cold engines require full choke to start. if your generator has manual choke, ensure it’s fully closed (choke position) for cold start. electric-start generators manage this automatically but manual choke generators require correct positioning.
after engine starts: gradually open choke as engine warms (2-5 minutes). leaving choke closed after warmup causes rough running and excessive fuel consumption.
check 2: oil level and viscosity (5 minutes)
cold weather thickens oil. standard 10W-30 oil (summer weight) in a generator at 20°F is significantly more viscous than at 70°F. thick oil makes engine hard to turn over and limits lubrication during cold start.
if you’re running summer-weight oil below freezing: drain and replace with 5W-30 or 0W-30 (winter weight). this is the most common generator cold-start failure cause that’s preventable. change oil before winter season.
oil level: low oil also causes starting problems (many generators have low-oil shutoff). check dipstick. add oil if below minimum line.
check 3: fuel quality (5 minutes)
gasoline can degrade during storage. if generator hasn’t run in 30+ days, stale fuel may prevent starting. drain fuel, add fresh gasoline with fuel stabilizer (sta-bil, $8).
water in fuel causes rough running or no-start. water settles to bottom of fuel tank. drain tank completely if suspected.
check 4: spark plug condition (15 minutes)
cold temperatures foul spark plugs faster than warm weather. remove spark plug (requires spark plug socket, usually 5/8-inch). inspect: wet with fuel (flooding), black sooty deposits (rich mixture), or worn electrode (replace regardless).
clean fouled plug: dry with paper towel, use fine sandpaper on electrode, reinstall. if plug is worn (electrode gap too large), replace immediately. replacement plugs: $4-8 each at auto parts store or camping world.
cold-start techniques that work
generator warming blanket: electric blanket designed for generators ($40-75) wraps around engine and maintains 50-60°F even in 0°F weather. most reliable cold-start solution. plug in the night before if temperatures will drop below 25°F.
starter fluid: very small amount of starter fluid (ether-based, $6 at auto parts) sprayed into air intake helps cold starts. use sparingly: excess damages engine. one short 0.5-second spray is sufficient.
warm water trick: pour warm (not boiling) water over engine block before attempting cold start. raises engine temperature 10-20°F, enough to help ignition. dry afterward to prevent rust.
bring inside overnight: small portable generators (honda eu2200i) fit in rv storage compartment. keeping generator at 65°F inside rv eliminates cold-start issues completely. pull out 5 minutes before starting to ventilate any fuel vapors.
problem 5: excessive condensation causing damage
symptoms
water droplets streaming down interior windows every morning.
wet spots on ceiling near roof vents or skylights.
soft or discolored interior walls (early mold/moisture damage).
musty smell inside rv despite cleaning.
understanding the cause
condensation forms when warm humid interior air meets cold surfaces. your rv produces moisture constantly: two people breathing and sleeping releases 1 quart of water vapor per night. cooking adds more. showering adds more. at 20°F exterior and 65°F interior, windows are cold enough to condense moisture from air at 40% relative humidity.
this is physics, not a failure. you cannot eliminate the source of moisture (you’re breathing). you can only manage the rate of accumulation and route moisture away from damaging surfaces.
immediate solutions

crack windows: open each window 1/4 inch. counterintuitive in cold weather but essential. this creates air exchange that removes moisture-laden air and brings in drier outside air. at quartzsite (very dry desert air), even a small crack dramatically reduces condensation. temperature drop from cracked windows: 2-4°F. condensation reduction: 40-60%.
bathroom vent fan on continuously: if you have a powered roof vent in bathroom, run it 24/7 on low speed. it exhausts moisture-laden air directly. replace stock vent fan with maxxair or fantastic fan with thermostat control ($100-150) for automated management.
DampRid containers: passive moisture absorbers ($8-12 each at walmart). place 2-3 throughout rv (one in bedroom, one in bathroom, one in living area). each container absorbs 10-14 oz of moisture before needing replacement (every 2-4 weeks in winter). visible indicator when full.
preventing surface damage
wipe windows every morning: 30-second task with microfiber cloth. removes moisture before it runs down and pools on window frame ledge where mold starts.
inspect monthly: check all window frames, roof vent surrounds, and slideout seals for early mold (black or green spots). treat immediately with rv mold and mildew cleaner ($8-12) if found.
reflectix on windows: reduces condensation by keeping window surface warmer. window surface at 20°F exterior without reflectix: approximately 35°F (below dew point of typical rv interior air). with reflectix: approximately 50°F (above dew point). condensation eliminated on covered windows.
proper ventilation beats all other solutions. rv walls and ceilings are not designed to handle constant moisture exposure. the solution is always removing moisture from air before it contacts cold surfaces, not wiping it up after.
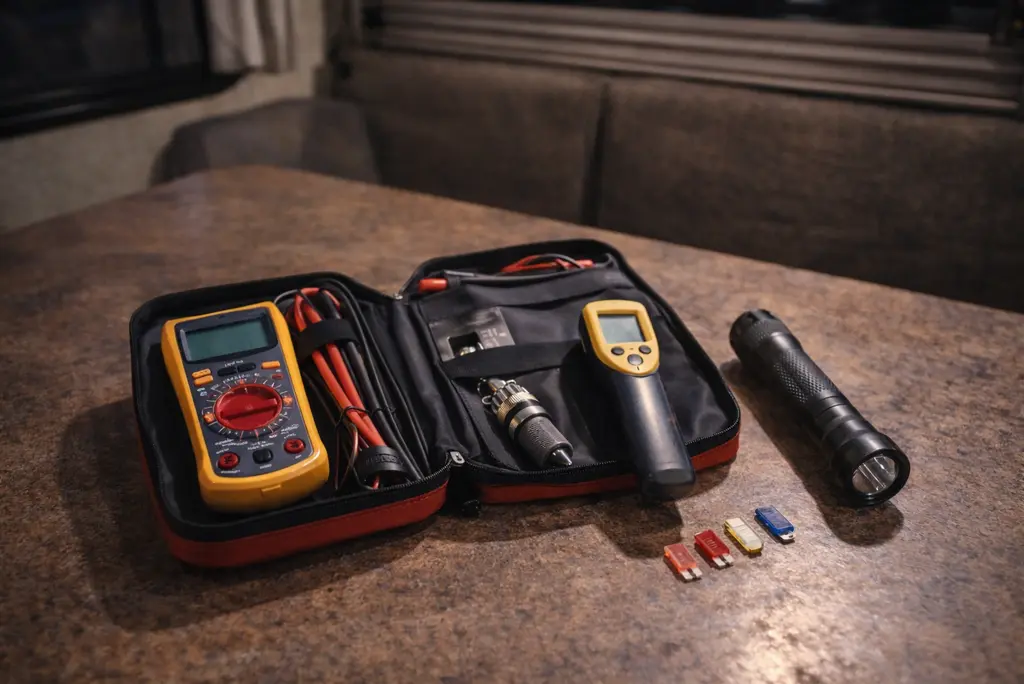
emergency preparedness: what to have on board
diagnostic tools ($60 total)
multimeter ($25, amazon basics): checks battery voltage, fuse continuity, 12V connections. the single most useful diagnostic tool for electrical problems.
infrared thermometer ($18): check pipe temperatures, battery temperature, identify cold spots in insulation. instantly tells you if pipe is frozen before you start tracing lines.
TDS meter ($18): verify water filter performance, identify high-mineral water sources. secondary use: check battery electrolyte (AGM only).
spare parts (critical)
furnace igniter for your specific furnace model ($22-35): most common furnace failure part. order before winter season. note your furnace brand and model number now.
spare 10-amp and 15-amp fuses (inline and blade style, $8 mixed pack): electrical failures often start with blown fuse. having spares means 60-second repair.
battery terminal cleaner and protector spray ($9): prevents corrosion that causes charging failures.
propane orifice cleaner ($12): spider webs in furnace orifice (common in stored rvs) cause ignition failures. small wire brush cleans without damage.
emergency heat (minimum viable)
mr heater buddy ($75): requires no installation, runs on 1-lb propane canisters or 20-lb tank with adapter hose ($20). 4,000-9,000 BTU. safe indoor use. store one in every rv you own indefinitely.
4 spare 1-lb propane canisters ($5 each): emergency fuel for buddy heater. takes up minimal space. buy once, keep permanently.
communication
garmin inreach mini 2 or zoleo ($200-300 device): two-way satellite texting and SOS from anywhere. mandatory for remote winter boondocking. if equipment fails beyond your ability to fix and you’re in an isolated location, this gets you help.
when to call for help vs. fix yourself
fix yourself: anything listed in this guide with the right parts and tools. most winter failures are simple causes with simple solutions.
call for help:
- suspected gas leak (smell propane inside rv, evacuate first, call from outside)
- CO alarm activation (evacuate, ventilate, call 911)
- electrical fire (disconnect shore power or batteries, extinguish if safe, call 911)
- medical emergency developing (hypothermia symptoms in any person, call 911 or activate satellite SOS)
- equipment failure you cannot diagnose after 30 minutes of systematic checking
the boundary between DIY repair and calling for help is simple: if you’re not making progress after 30 minutes, get help. ego has no place in winter rv troubleshooting when exterior temperature is 15°F.
every failure covered in this guide has an emergency fallback: backup heater, battery reserve, generator. the preparation that prevents bad situations from becoming dangerous ones is covered in full in the [winter boondocking survival guide], from battery sizing to insulation to emergency communications. prepare before you need these repairs. they’re faster and cheaper to prevent than to fix at 2am.