
Author
Most RV owners set their tire pressure from one of two numbers: the maximum on the sidewall, or a figure someone at the campground swore by. Both are usually wrong. The right RV tire pressure depends on how much weight each tire actually carries, and that changes every time you load the rig.
In 19 years of vehicle inspection, pressure is the tire problem I see most, because it’s invisible. A tire running well below the pressure on the manufacturer’s tire placard can look perfectly normal. Only a gauge tells you the truth. This guide shows you how to find the correct pressure for your motorhome or travel trailer, how to read a load and inflation chart, and how to adjust for the seasons. It’s part of our complete RV tires guide.
Why RV Tire Pressure Matters More Than on a Car
RV tires carry heavy loads for long distances, often close to their rated limits. When pressure drops, the tire flexes more with every turn of the wheel. That flex builds heat, and heat is what destroys tires from the inside.
- Safety: NHTSA warns that low inflation can lead to a flat, a blowout or tread separation.
- Handling: soft tires make a heavy RV wander, sway and brake poorly.
- Braking balance: when the two tires on the same axle run at different pressures, they don’t grip the road the same way. On a roller brake tester, that shows up as a left-right braking imbalance, a serious defect that fails a technical inspection in my work. On the road, you feel it as the RV pulling to one side when you brake hard.
- Wear: wrong pressure wears tread unevenly and shortens tire life.
- Fuel: under-inflated tires raise rolling resistance, so you burn more fuel every mile.
RVGeo tool
How much is low tire pressure costing you in fuel?
Under-inflated tires roll harder, so you burn more fuel every mile. The Fuel Waste Calculator estimates the extra gallons and dollars low pressure costs you per year.
- Enter just 3 numbers: your MPG, fuel price and miles driven
- Get a realistic low-to-high range in about 30 seconds
- Excel calculator + quick guide and worked examples (PDF)
Get the calculator — $29 See how it works
One-time payment, instant download, 30-day refund if it doesn’t work as described. This is RVGeo’s own product. Results are estimates, not official measurements.
Sidewall Max vs RV Placard: Which Number Is Right?
There are two pressure numbers on or near every RV tire, and they mean different things.
| Number | Where you find it | What it means |
|---|---|---|
| Maximum pressure | Molded on the tire sidewall | The highest cold pressure the tire is designed for, and the pressure at which it carries its maximum load. Not a target. |
| Recommended pressure | Tire and loading placard (driver’s door frame on motorhomes, front left exterior on most trailers) | The pressure the manufacturer chose for the RV as built, at its rated weight |
| Wheel maximum | Stamped on the wheel | The highest pressure the wheel can safely hold. Never exceed it. |
Which placard value applies to you?
On North American vehicles, the federal tire placard or certification label (required by FMVSS 110 for vehicles up to 10,000 lbs and FMVSS 120 above that) gives one cold pressure per axle, calculated for the vehicle loaded to its maximum weight, the GVWR. Whether one person or five are on board, that’s your reference value.
Some owner’s manuals, and many European-built vans, list two values: unloaded and loaded. If yours does, a simple rule I use on light vehicles: 1 to 3 people with little luggage counts as unloaded; 4 to 5 people with luggage counts as loaded (figure about 155 lbs per person).
The two most common mistakes I see in inspection
- Inflating to the sidewall maximum. When a vehicle arrives clearly over-inflated, the tires have very often been pumped straight to the “Max Press” number on the sidewall, for example 50 or 80 psi. That’s the most the tire can hold, not what your RV needs. The result: a harsh ride, wear down the center of the tread and less grip.
- One number for every tire. A shop or a driver at the air machine sets all four tires to the same value, while the manufacturer specifies different pressures front and rear. The front ends up over-inflated, the rear under-inflated, or the other way round.
How far off is too far?
Your owner’s manual gives the tolerance the manufacturer allows. Compare cold readings with the cold value; after driving, readings are naturally higher and the tolerance isn’t the same. As a rough guide on a light vehicle, a drift of 3 to 4 psi from temperature changes is normal. Beyond about 7 psi, handling, wear and fuel use already change noticeably.
On a heavy RV running 80 psi or more, 7 psi is a smaller share of the total, so go by the load and inflation table instead: any pressure below what the chart requires for your weight is under-inflation, whatever the number.
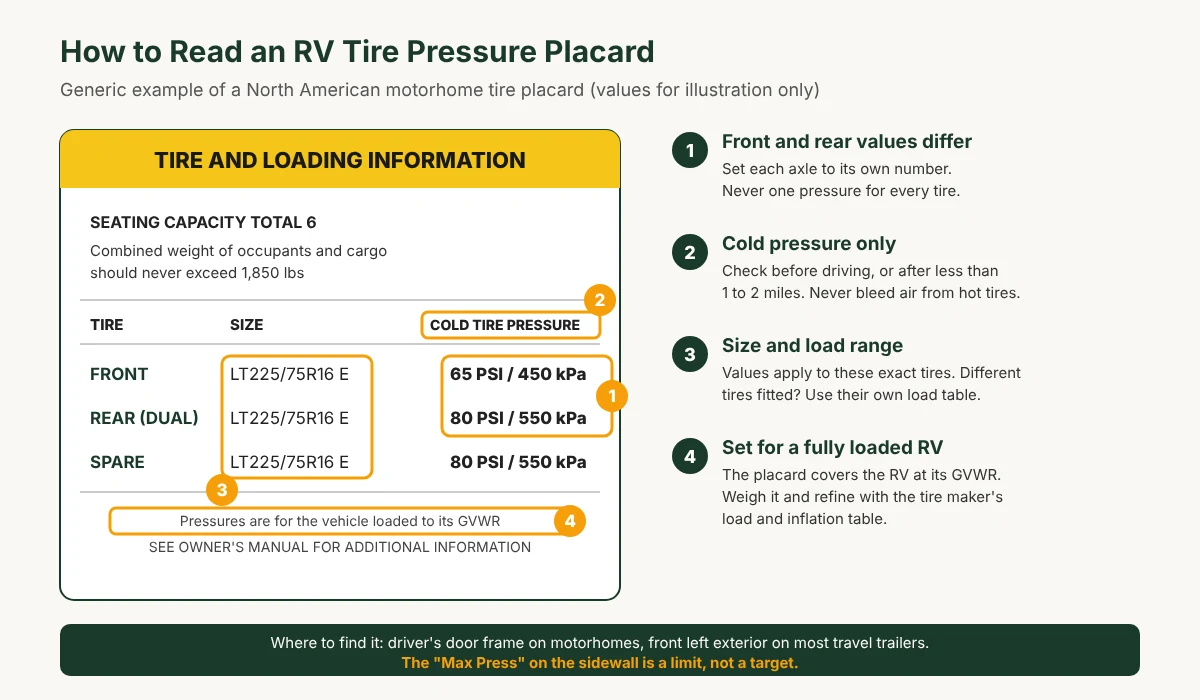
The placard is a good starting point. But it doesn’t know what you’ve loaded since the RV left the factory. That’s why the most accurate pressure comes from weighing the rig and using a load and inflation chart.
How to Find the Correct RV Tire Pressure: 4 Steps
- Weigh the RV loaded for travel. Full fuel, water and propane as you normally travel, gear and people on board. A CAT scale at a truck stop gives axle weights. Corner weighing (also called four-corner or wheel-position weighing) gives the load on each wheel position, which is what you really need. It’s offered at many RV rallies and by mobile weighing services, and the RV Safety & Education Foundation explains the method.
- Find the load and inflation chart for your exact tire. Match the size and load range on your sidewall, for example “LT225/75R16 Load Range E.” Tire makers publish these charts based on the load standards of the Tire and Rim Association (TRA); Michelin’s are on its RV load and inflation tables page.
- Use the heaviest end of each axle. Michelin’s guidance is to weigh each axle end, find the pressure required by the heaviest end, and set every tire on that axle to that pressure, so the axle stays balanced.
- Set it cold. Cold means before you drive, or after less than 1 to 2 miles. If you’ve driven farther, wait at least 30 minutes; NHTSA’s stricter definition is three hours parked. Pressure measured hot reads higher, so never let air out of a hot tire to match the cold number.
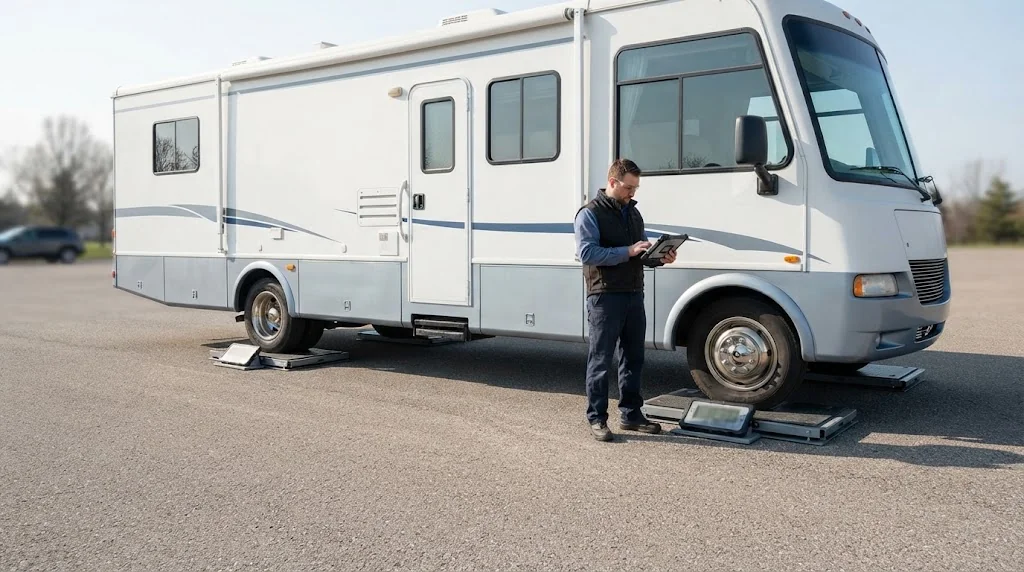
Don’t assume a 50/50 split
RVs are rarely balanced side to side. Slide-outs, residential refrigerators, water tanks and generators often sit on the same side of the coach. Tire engineer Roger Marble, writing in RV Travel, reports large RVs carrying more than 1,000 lbs more on one end of an axle than the other. If all you have is a CAT scale axle weight, he suggests assuming the heavier end carries 52 to 54% of the axle load, and he calls that a poor substitute for real corner weights.
In inspection, a load that always sits on one side shows up beyond the tires: a visible sag on the heavy side (often the kitchen or slide-out side), faster wear of the suspension bushings and uneven shock absorber work. A tire can be overloaded even when the axle as a whole is under its rating.
Add a safety margin, within the limits
- Never go below the chart minimum for the weight measured on your heaviest wheel position.
- Add a margin. Roger Marble recommends about 10% above the chart minimum, which works out to roughly 5 to 10 psi on most RV tires.
- Don’t drop below the chassis placard if the chassis maker’s value (Ford F-53, Freightliner Custom Chassis and others) is higher than your chart-based number.
- Never exceed the tire’s sidewall maximum (“max psi at max load”) or the pressure limit stamped on the wheel.
Write your final numbers on a card in the glove box so every check uses the same targets.
How to Read an RV Tire Pressure Chart
An RV tire pressure chart, also called a load and inflation table, lists how much weight a specific tire can carry at each cold pressure. Tire makers publish their own, based on Tire and Rim Association (TRA) load standards; always use the chart from your tire’s manufacturer.
- Rows: the tire size and load range.
- Columns: cold inflation pressures, usually in 5 psi steps.
- Cells: the maximum load at that pressure, given separately for single and dual fitments.
To use it, take the weight of your heaviest wheel position. Find the first pressure column where the load in the table is equal to or greater than that weight. That’s your minimum cold pressure for the whole axle. Then add the safety margin from the previous section, without going over the tire’s or the wheel’s maximum.
Read the dual column for duals. A tire in a dual pair is rated to carry less than the same tire running single, so using the single column on a dual axle overstates your capacity. Check how your chart presents duals, too: some list the load per tire, others, like Michelin’s RV charts, list the load for the pair.
Worked example: a Class C on LT225/75R16 Load Range E
These values come from Michelin’s RV load and inflation chart for the LT225/75R16 LRE (XPS Rib, 80 psi maximum).
| Cold pressure | 55 psi | 60 psi | 65 psi | 70 psi | 75 psi | 80 psi |
|---|---|---|---|---|---|---|
| Single, per tire | 2,060 lbs | 2,190 lbs | 2,335 lbs | 2,440 lbs | 2,560 lbs | 2,680 lbs |
| Dual, per pair | 3,750 lbs | 3,990 lbs | 4,300 lbs | 4,440 lbs | 4,660 lbs | 4,940 lbs |
- Front axle (single tires). Corner weighing shows 2,050 lbs on the left front and 2,180 lbs on the right front. The heavier end is 2,180 lbs. The first column that covers it is 60 psi (2,190 lbs).
- Add the margin. 60 psi + 10% = 66 psi. That’s under the 80 psi tire maximum, so both front tires go to 66 psi cold. If the chassis placard says more, use the placard value.
- Rear axle (duals). The heavier rear end carries 4,200 lbs on its pair of tires. The first dual column that covers it is 65 psi (4,300 lbs per pair). With the margin, that’s about 72 psi for all four rear tires.
Same tires, same RV, two different pressures front and rear. That’s exactly why one number for every tire is wrong. The weights above are an example; use your own scale readings.
When your weight is off the chart
If your weight is above every value in the row, the tire is overloaded at any pressure. More air won’t fix it; it’s a tire choice problem. In inspection, I regularly see light trucks, converted vans and utility trailers running passenger tires (marked P, SL or XL) instead of LT or commercial “C” tires. On paper, the load index can look acceptable. Once the rig is loaded with full water, fuel and gear, the tire works beyond its capacity in corners and on hot highways, and the casing degrades fast or the tire blows out. The fix is a tire with a higher load range, chosen from your real weights.
Motorhome Tire Pressure
Motorhome tire pressure works the same way, with a few extra checks:
- Front and rear axles usually need different pressures. The steer axle often carries the engine; the drive axle carries the living area. Weigh both.
- Weigh loaded for a trip, never empty. On a Class A or Super C, the difference between an empty coach and one loaded with full fuel, fresh water, propane, gear and passengers runs to several tons. Set pressures from the loaded weights.
- Re-weigh after changes, such as adding a tow car, a heavier battery bank or a full-time load.
Air suspension can hide an overload
This is one of the traps I find most dangerous in inspection. On an air-ride chassis, height control valves keep inflating the air bags to hold the coach level. An overloaded motorhome therefore sits perfectly level, and nothing looks wrong, while the tires, wheels and bearings carry far more than they should. The sag you can spot on leaf springs never shows. On air ride, only a scale tells the truth.
The same goes for add-on equipment. Air helper springs with separate left and right circuits can level a sagging side and improve the ride, but they don’t move a single pound: the tire on the heavy side still carries the extra weight. Hydraulic leveling jacks level the rig in camp and do nothing on the road. The only real answer to a side-to-side imbalance is corner weighing, a pressure set for the heaviest wheel position, and a TPMS that watches the temperature on that side.
Tag axles and lift axles
A tag axle is weighed separately and has its own pressure from the load table. Many coaches let you dump the air from the tag axle or lift it for tight maneuvers; its load then moves onto the drive axle. In inspection on heavy trucks, I regularly see the same mistake on the road: a lift axle raised to save tire wear while the truck is loaded, which pushes the drive or steer axle past its tires’ load index. Drive with the tag axle down, except as your chassis maker allows for low-speed maneuvering.
Dual wheels: the four problems I see most
- The forgotten inner dual. Its valve is hard to reach, so it’s checked less often. It runs under-inflated and leaves its partner, or itself, carrying load until heat destroys it. Fit secured valve extenders so you can check it in seconds.
- Sidewalls touching. When a pair is under-inflated or overloaded, the sidewalls bulge and rub against each other under load, generating heat.
- Debris between the tires. A rock wedged between the duals hammers both sidewalls with every rotation. Look between them at every stop.
- Mismatched pairs. Different brands, tread patterns or wear levels in the same pair mean different diameters. One tire drags and the other carries more than its share. Set both tires of a pair to the same pressure, from the dual column of the chart.
Travel Trailer Tire Pressure
Travel trailer tire pressure follows the same chart method, but trailers have their own risks. Most run ST (Special Trailer) tires, and on tandem axles those tires are dragged sideways in every tight turn, which twists the sidewalls and the belts.
- Weigh the trailer hitched, then each axle, then the tongue weight. Corner weights are better still.
- Set every tire on a tandem trailer from the heaviest wheel position, so all four run the same pressure.
- Re-check after loading water: every gallon of fresh water adds roughly 8.3 pounds.
Why trailer tires usually end up at the sidewall maximum
Earlier I said the sidewall maximum is a limit, not a target. Trailers are where the chart and that limit usually meet. Most travel trailers run close to their certified maximum weight (GVWR). Weigh one, read the load table, add the margin, and you almost always land on the highest column: the maximum pressure molded on the sidewall. So on most trailers, the right cold pressure is the sidewall maximum, as long as the wheel is rated for it. The point isn’t to pump every tire to the max by habit. It’s that the method, applied to a heavily loaded trailer, leads there.
The first trip after storage
A trailer that sits for months loses air through the rubber itself, and cold weather lowers the reading further. In inspection, I regularly see caravans arrive after the winter break 15 to 25 psi below the manufacturer’s value. The real figure depends on how long the trailer sat, how it was used before and the temperature swing. Towing a loaded trailer on tires that soft overheats the casing from the first miles. Before the first trip of the season, set every tire cold to its target, spare included.
Mismatched tires on the same axle
Trailers are where I find the most mixed tires: different brands, different ages (a 10-year-old original next to a brand-new replacement) and sometimes different internal structures on the same axle. Those tires don’t have the same rolling diameter or the same stiffness. Under braking or in a fast corner, the trailer behaves unevenly and can start to sway. Every tire on an axle should match in size, load range, structure and, ideally, age.
On age itself, the usual replacement limits are averages. How often the trailer is used, how many miles it covers and how long it sits in the sun all move them. A tire that spends most of the year parked outdoors ages faster than one that rolls regularly, and in inspection, what I find on the tire depends on those factors as much as on its date code.
Seasonal RV Tire Pressure Adjustments
Air contracts in the cold and expands in the heat. Camping World notes that tire pressure drops about 1 to 2 psi for every 10-degree drop in air temperature. Over a season, that adds up.
Winter and cold mornings
- A tire set in a warm garage will read low once it sits outside overnight. Check pressure in the conditions you’ll drive in.
- If you travel from a warm region into a cold one, re-check the first cold morning.
- Never judge a tire by eye. Only the gauge counts: set each tire to its cold target.
Summer and hot climates
- Pressure rises as tires heat up while driving. That’s normal and already accounted for in the cold target.
- Never bleed air from hot tires to bring them back to the cold number. They’ll be under-inflated once they cool.
- Check early in the morning, before the sun hits one side of the RV. In hot weather, an RV parked in the afternoon sun can read 5 to 8 psi higher than at dawn before it has moved an inch, from the heat of the air and the pavement alone. Tires in direct sun also read higher than those in the shade, which can look like a left-right difference that isn’t really there. Compare tires that are all cold and all in the same conditions.
How much rise is normal after driving?
After a long stretch at highway speed, a pressure rise of about 10 to 15% over the cold setting is normal; in inspection, that’s what I treat as expected. It depends on load and outside temperature.
The warning signs are different: a tire that climbs far beyond that range, or a sudden gap in pressure or temperature between two tires on the same axle, or between the inner and outer tire of a dual pair. That points to a real problem: a tire running badly under-inflated, a one-sided overload, two duals rubbing, or a dragging brake. These are the reference points to use when you set the alert thresholds on a TPMS.
Adapt to your own conditions
The tolerances in this guide are reference points, not fixed laws. How much pressure rises on the road and how much it drifts between checks change from one climate to another and from one kind of road to another: a summer interstate run in the desert is not a spring drive on mountain back roads. Watch what your own tires do over real trips, with a gauge and a TPMS. Experienced drivers end up with their own practical values, and that’s fine, as long as they stay close to the chart and never fall below its minimum.
Tools for Checking RV Tire Pressure
- An accurate gauge. In inspection, we only trust calibrated instruments, and that’s the standard to aim for. Choose a quality digital or dial gauge that reads comfortably above your highest pressure (many motorhome tires run above 80 psi), and compare it from time to time with a calibrated gauge at a tire shop. A cheap gauge that drifts gives you a precise-looking number that’s simply wrong.
- A dual-head chuck for inner duals, together with secured valve extenders, so the inner tires get checked as easily as the outer ones.
- A 12V air compressor rated for RV pressures, so you can correct a low tire on the spot instead of driving to find air.
- A TPMS to watch pressure and temperature while you drive. It warns you about change; it doesn’t tell you whether your starting pressure was right. It complements the cold check with a gauge, it doesn’t replace it.
Common RV Tire Pressure Mistakes
The number one tire problem I record in inspection isn’t worn tread: it’s pressure that ignores the manufacturer’s values, because the owner never looked them up. Here are the mistakes behind it.
- Never checking the manufacturer’s values. No placard read, no owner’s manual opened, no load table: the pressure is a guess.
- Inflating a motorhome to the sidewall maximum “to be safe.” On a heavily loaded trailer the chart often leads there; on a motorhome, it’s usually too much.
- One pressure for every tire, when the front and rear axles need different values.
- Assuming a 50/50 split from side to side instead of corner weighing.
- Trusting an air-ride coach that “looks level.” Air suspension hides an overload; only a scale shows it.
- Checking hot, then letting air out to match the cold number.
- Judging a tire by eye instead of using an accurate gauge.
- Forgetting the inner duals and the spare.
- Exceeding the wheel’s maximum pressure, often after switching to a higher load range tire.
Pressure is only one part of tire health. Even a perfectly inflated tire can fail if it’s too old; check yours with our guide to reading the tire date code.
RV Tire Pressure FAQ
What should my RV tire pressure be?
Start with the cold pressures on your RV’s tire placard. For the most accurate number, weigh the loaded RV wheel by wheel, find the load and inflation chart for your exact tire, take the pressure required by the heaviest wheel position on each axle and add a margin of about 10%. Never go below the chart minimum or above the tire’s or wheel’s maximum.
Should I inflate RV tires to the max PSI on the sidewall?
Not by habit. The sidewall number is the most the tire can hold, and the pressure at which it carries its maximum load. On a motorhome, the chart usually calls for less. On a travel trailer loaded close to its GVWR, the chart often does lead to the sidewall maximum, as long as the wheel is rated for it.
What is the best tire pressure for a travel trailer?
The pressure the load and inflation chart requires for your heaviest wheel position, plus a margin, without exceeding the tire or wheel maximum. Because most trailers run close to their weight limits, that usually ends up at or near the sidewall maximum. Set all tires on a tandem trailer to the same value.
How much does temperature change RV tire pressure?
Roughly 1 to 2 psi for every 10°F change in air temperature. Sun matters too: an RV parked in afternoon sun can read several psi higher than at dawn. Check cold, in the conditions you’ll travel in, and never let air out of hot tires.
How much does tire pressure rise when driving?
After a long highway run, a rise of about 10 to 15% over the cold setting is normal. A much bigger rise, or a large gap between two tires on the same axle, signals a problem such as under-inflation, overload on one side or a dragging brake.
How often should I check RV tire pressure?
Cold, two to three times a week while you’re traveling and always before a travel day, and at least once a month while the RV is parked, on every tire including the inner duals and the spare. Always check before the first trip after storage. A TPMS adds continuous monitoring while you drive.

Published on October 18, 2026
Mike Dawson
Mike Dawson is RVGeo's lead editor, applying inspection-grade rigor to RV research - verifying manufacturer specs, testing components, and fact-checking pricing and claims before they're published. RVGeo's approach draws on a background in automotive technical inspection, applied specifically to RV electrical, power, and safety systems. Mike oversees RVGeo's foundational guides on power systems, DIY conversions, and van-life setup, with every recommendation checked against real specs and current pricing rather than assumptions.
This post contains affiliate links. If you make a purchase through these links, we may earn a commission at no extra cost to you.