Author
Why installation is easier than you think
When I bought my first RV water filter eight years ago, I stared at it for 20 minutes trying to figure out where it went. The instructions said “connect between pressure regulator and hose” but I didn’t even know what a pressure regulator was. I almost returned the filter.
Now, after installing dozens of filters across three different RVs and helping countless fellow RVers, I can tell you: installing an RV water filter is one of the easiest upgrades you’ll ever make. Most inline filters take 2-5 minutes with zero tools. Even complex under-sink systems only take 1-2 hours if you follow clear steps.
Before installing, understand which filter type suits your needs. our complete rv water filter guide explains inline, canister, and multi-stage options with testing data
In this guide, I’ll walk you through every type of RV water filter installation, from simple inline filters to advanced multi-stage systems. I’ll share the mistakes I made so you don’t have to, show you exactly what tools you need, and give you confidence to do it yourself.
By the end of this article, you’ll be ready to install your filter in under 10 minutes and start enjoying clean water immediately.
Before you start: what you need to know
Understanding your rv water system
Your RV has two water systems that work differently:
City water connection (what we’re filtering):
- connects directly to campground spigot
- water flows straight to faucets without tank
- always on when connected
- this is where you install filters
Fresh water tank:
- internal tank storing 30-100 gallons
- used when not connected to city water (boondocking)
- powered by 12V water pump
- filter during filling, not after pump
Most RVers use city water at campgrounds, so we’re focusing on city water filter installation.
The basic city water setup
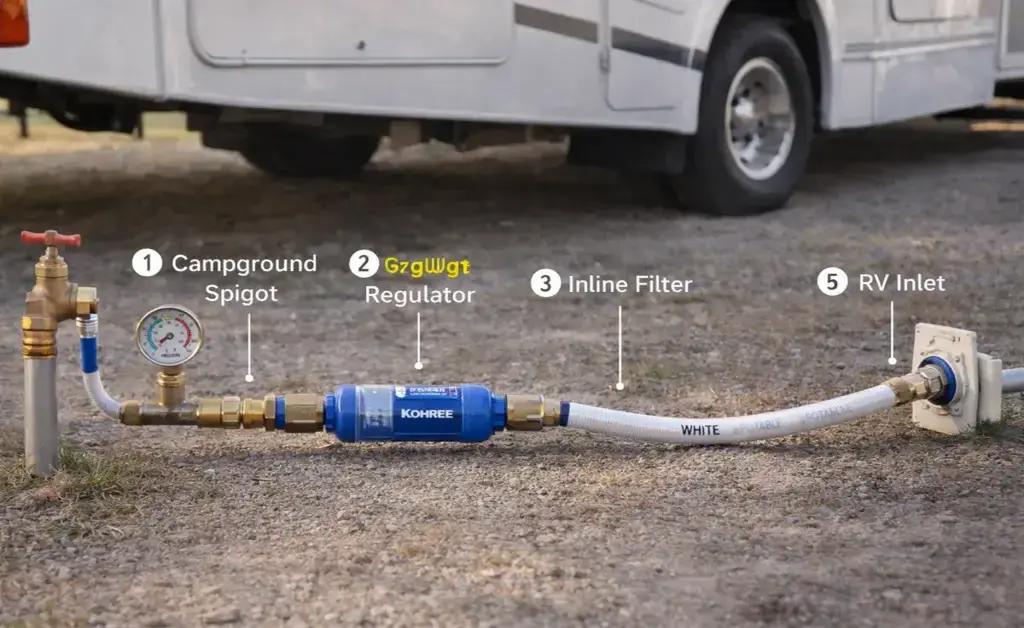
Here’s what connects in order:
- campground spigot
- pressure regulator (protects RV plumbing from high pressure)
- water filter (inline or external)
- potable water hose (white/blue, never garden hose)
- rv city water inlet
Your filter goes between regulator and hose. simple as that.
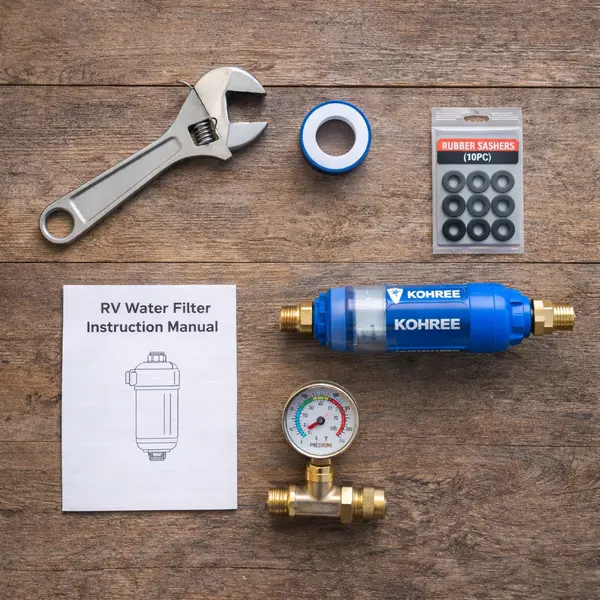
Tools and materials needed
Need to choose a filter first? we’ve tested 8 models extensively. see our best inline rv water filters tested for recommendations
For inline filter installation (most common):
- inline water filter ($15-50)
- pressure regulator with gauge ($30-50 if you don’t have one)
- potable water hose (already have)
- spare rubber washers ($3 for pack of 10)
- adjustable wrench (optional, only if hand-tight isn’t enough)
For under-sink canister installation:
- canister filter system ($100-400)
- drill with bits
- screwdrivers (phillips and flathead)
- adjustable wrench or pliers
- tubing cutter or sharp knife
- teflon tape
- bucket (for catching water during installation)
- towels
For external multi-stage systems:
- filter system ($400-1,200)
- mounting hardware (usually included)
- drill
- wrenches
- possibly professional help ($100-200 labor)
Installation guide 1: inline filters (beginner – 5 minutes)
This is what 90% of RVers install first. if you can connect a garden hose, you can do this.
Difficulty level: easy (1/5)
time required: 2-5 minutes
tools needed: none (or wrench if tight)
cost: $15-50 for filter
Step-by-step installation
Step 1: install pressure regulator first
If you don’t have pressure regulator yet, install it now (you need one even without filter):
- screw brass end onto campground spigot
- hand-tighten firmly
- add 1/4 turn with wrench if needed
- don’t over-tighten (brass threads can strip)
Step 2: identify filter flow direction
Look for arrow on filter body showing flow direction. arrow must point toward RV (away from spigot).
Common mistake: installing backwards. water will flow but won’t filter properly.
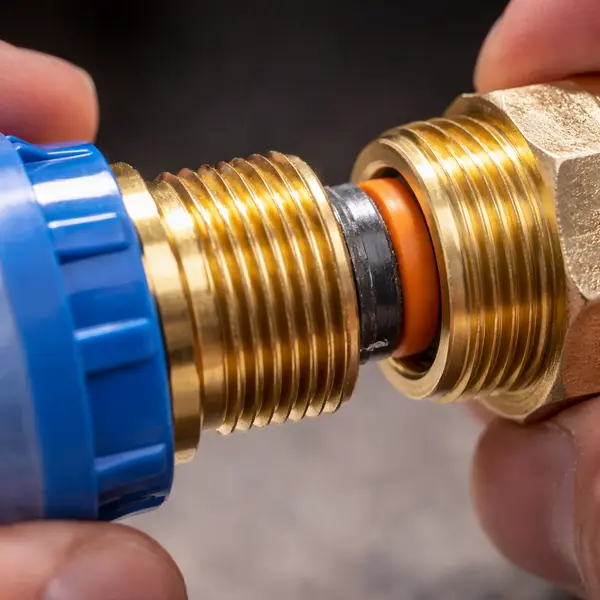
Step 3: check rubber washers
Look inside filter connections – should see rubber washer in each threaded end. if missing or cracked, replace before connecting.
Rubber washers prevent leaks. they’re essential.
Step 4: connect filter to pressure regulator
- find filter end with arrow pointing away from it (this is output)
- screw onto pressure regulator outlet
- hand-tighten firmly (should feel snug)
- if you can still turn easily, add 1/4 turn with wrench
- don’t over-tighten plastic threads (they crack)
Step 5: connect water hose to filter
- attach potable water hose to filter input (end with arrow pointing away)
- hand-tighten firmly
- check connection is snug
Step 6: connect hose to rv
- attach other end of hose to rv city water inlet
- hand-tighten
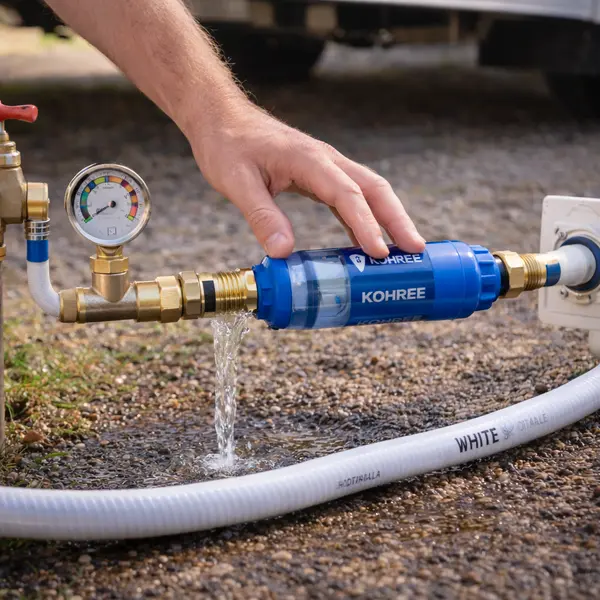
Step 7: turn on water slowly
- start with 1/4 turn of spigot handle
- listen carefully for leaks
- check all connections (spigot, regulator, filter both ends, rv inlet)
- if all dry, open spigot fully
Step 8: flush the system
- go inside rv
- turn on cold water faucet
- let water run 2-3 minutes (flushes carbon fines from new filter)
- water may look slightly gray or black at first – this is normal
- after 2-3 minutes, water should run clear
Congratulations! you just installed your rv water filter.
Common installation mistakes (and how to fix them)
Mistake 1: filter installed backwards
Symptom: water flows but tastes same, no improvement
fix: check arrow direction, reinstall correctly
Mistake 2: forgot rubber washers
Symptom: connections leak when spigot opens
fix: turn off water, unscrew connection, add washer, reconnect
Mistake 3: over-tightened plastic threads
Symptom: cracking sound, visible cracks in housing
fix: back off immediately, check for damage, replace if cracked
Mistake 4: using teflon tape on hose threads
Symptom: connections difficult to tighten, may leak
fix: remove teflon tape (not needed for hose connections), use rubber washers instead
Mistake 5: didn’t flush system
Symptom: black specks in water, tastes funny
fix: let water run 2-3 minutes to flush carbon fines
Pro tips for inline installation
Tip 1: use flexible hose protector between filter and rv inlet. prevents filter from dangling and stressing connections.
Tip 2: mark installation date on filter with permanent marker. set phone reminder for 2-3 months to replace.
Tip 3: keep spare filter in rv storage. murphy’s law: you’ll need it friday night of holiday weekend when stores closed.
Tip 4: check rubber washers every time you disconnect. replace annually or when cracked.
Tip 5: at low-pressure campgrounds (below 40 psi), consider removing filter temporarily if pressure becomes frustrating. your plumbing matters more than perfect filtration for one weekend.
Installation guide 2: under-sink canister systems (intermediate – 1-2 hours)
These provide better filtration and longer life than inline filters, but require cutting into water lines.
Difficulty level: medium (3/5)
time required: 1-2 hours first time, 30-45 minutes experienced
tools needed: drill, screwdrivers, tubing cutter, wrench, teflon tape
cost: $100-400 for system
Before you start
Check your space: you need 12-18 inches vertical clearance under sink. measure from bottom of sink to cabinet floor.
Turn off water: turn off rv water pump. open faucet until water stops flowing.
Have towels ready: you’ll spill some water when cutting lines.
Step-by-step installation
Step 1: plan your installation
Decide where filter will mount:
- under kitchen sink (most common)
- in bathroom vanity cabinet
- in wet bay (external compartment)
Filter must be vertical with canisters hanging down. you need clearance to unscrew canisters for replacement.
Step 2: mount the bracket
- hold bracket against wall or cabinet side
- use level to ensure it’s straight
- mark screw holes with pencil
- drill pilot holes (smaller than screw diameter)
- install screws and bracket
- test by pulling hard – must support 15-20 lbs
Step 3: identify cold water line
Under sink, you’ll see two lines:
- hot water (usually left side, may have red marking)
- cold water (usually right side, may have blue marking)
Filter only cold water (hot water damages filter media). some RVers filter both, but not recommended.
Step 4: cut into cold water line
This is the scary part, but it’s easier than you think:
- measure 12 inches from sink
- use tubing cutter to cut line cleanly
- keep bucket under line to catch water (small amount)
- you now have two line ends: one from source, one to sink
Step 5: install shut-off valve (optional but recommended)
Insert shut-off valve or t-fitting at cut point:
- push line into compression fitting
- tighten compression nut hand-tight
- add 1/4 turn with wrench
This lets you turn off water to filter for maintenance without turning off whole rv.
Step 6: connect inlet line to filter
- measure distance from shut-off valve to filter inlet
- cut appropriate length of 1/4″ or 3/8″ tubing
- connect one end to shut-off valve with compression fitting
- connect other end to filter inlet (usually marked “in”)
- hand-tighten, then 1/4 turn with wrench
- apply teflon tape to threads if metal-to-metal
Step 7: connect outlet line
Two options here:
Option a: back to existing line (filtered water at this sink only)
- connect filter outlet to line going to sink
- same compression fitting process
Option b: dedicated faucet (my recommendation)
- drill hole in sink or countertop for new faucet
- follow faucet manufacturer instructions
- connect filter outlet to dedicated faucet
- this gives you choice of filtered or unfiltered water
Step 8: hang filter canisters
- place empty canisters on bracket
- hand-tighten to caps (don’t use wrench – you’ll need to remove them)
- install filter cartridges according to system instructions:
- stage 1 usually sediment filter (goes in first canister)
- stage 2 usually carbon block (goes in second canister)
- stage 3 specialty filter if 3-stage system
Step 9: turn on water and check for leaks
- open shut-off valve slowly
- check every connection for drips
- tighten any leaking connections
- open faucet and let water run 5 minutes (flushes system)
Step 10: check for leaks after 24 hours
Sometimes slow leaks appear after system pressurizes. check again next day.
Installation is just the beginning. proper maintenance ensures long-term performance. follow our maintenance and replacement schedule guide to protect your investment
Troubleshooting under-sink installation
Problem: leaking at compression fittings
Solution: tighten 1/4 turn more, or remove and reinstall with teflon tape
Problem: not enough clearance to unscrew canisters
Solution: remount bracket higher, or choose filter with shorter canisters
Problem: water pressure very low
Solution: check if filter cartridges installed correctly, ensure no kinks in tubing
Problem: air in lines (sputtering faucet)
Solution: let water run 5 minutes to purge air
Installation guide 3: external multi-stage systems (advanced – 2-4 hours)
These mount in wet bay or exterior, filtering all rv water.
Difficulty level: hard (4/5)
time required: 2-4 hours diy, 1-2 hours professional
my recommendation: hire mobile rv tech ($100-200 labor)
cost: $400-1,200 for system
Why i recommend professional installation
I paid $150 for professional installation of my clearsource premier. here’s why it was worth it:
- proper mounting location (protected from freezing)
- correct pressure management
- quick-disconnect fittings (tool-free cartridge changes)
- warranty protection (some void with diy install)
- leak-tested under full pressure
- done in 2 hours versus my estimated 4-6 hours
If you’re confident with plumbing and have installed multiple systems before, diy is possible. if this is your first time, hire a pro.
Diy installation overview (if you’re determined)
Step 1: choose mounting location
Must meet all these requirements:
- protected from freezing (heated wet bay or southern climates only)
- accessible for cartridge changes
- supports 30-40 lbs when full
- space for 18-24 inches of filter housing
- close to city water inlet
Step 2: install mounting board
Wet bay walls are often thin. install 3/4″ plywood backing board first, then mount filter bracket to plywood.
Step 3: plumb inlet
- locate city water inlet inside wet bay
- install t-fitting to split line
- one side to filter, one side remains original path
- or completely reroute through filter (my tech did this)
Step 4: install pressure regulator (if not included)
Some systems include pressure regulator. if not, install separate regulator before filter.
Step 5: connect stages
Follow manufacturer instructions to connect stage 1 output to stage 2 input, etc.
Step 6: install outlet
Connect final stage output back to rv plumbing going to fixtures.
Step 7: add drain valves
Install drain valve at bottom of each stage for winterization.
Step 8: pressure test
Turn on water slowly, check every connection, fix leaks before using.
Planning to filter natural water sources? boondocking requires additional purification beyond standard filters. check our boondocking water filtration setup guide
Winterization: protecting your filter investment
For inline filters:
- disconnect from hose
- shake out all water
- bring indoors to heated space
- store in plastic bag
Never store wet filter in freezing temps (cracks housing).
For under-sink systems:
- turn off inlet valve
- release pressure (open faucet)
- unscrew canisters (have towel ready)
- remove cartridges
- drain canisters completely
- store cartridges indoors in sealed bags
For external systems:
- turn off city water and pump
- open all drain valves
- let water drain completely (several gallons)
- if rv will be in freezing temps: remove cartridges
- if wet bay stays heated above 40°f: leave installed
Frequently asked questions
Can i install filter without pressure regulator?
Technically yes, but don’t. pressure regulators protect your rv plumbing from campground pressure spikes (sometimes 100+ psi). they cost $30-50 and prevent thousands in damage. always use one.
Do i need special tools?
For inline filters: no tools needed (or basic wrench).
for under-sink: basic hand tools most rvers already have.
for external systems: more advanced tools or hire professional.
How long does installation take?
Inline: 2-5 minutes
under-sink: 1-2 hours first time
external: 2-4 hours diy or 1-2 hours professional
Can i install filter permanently in rv plumbing?
Yes, but I don’t recommend it. inline filters are portable – you can take them with you to different campgrounds. permanent installation means you can’t remove filter at low-pressure sites.
What if i make a mistake?
Most mistakes are easily fixed:
- wrong direction: unscrew and flip
- leak: tighten connection or add washer
- cracked housing: replace filter ($15-30)
Worst case: you need new tubing ($5) or new filter. no permanent damage to rv.
You can do this:
I’ve watched countless RVers stare at filters like I did eight years ago, intimidated by something that’s actually simple. here’s the truth: if you can connect a garden hose, you can install an inline filter. if you can follow ikea furniture instructions, you can install an under-sink system.
Start with inline filter. install it at your next campground. you’ll spend 5 minutes and immediately taste the difference. once you gain confidence, upgrade to under-sink or external systems if desired.
The hardest part is starting. after your first installation, you’ll wonder why you waited so long.
My challenge: install your filter at your next campground. time yourself. I bet you’ll do it in under 10 minutes. then send me a message telling me I was right.
Published on January 30, 2026
Emma STONNE
Emma Stone is an RV lifestyle blogger and outdoor adventure specialist focused on sustainable van life and off-grid living across the American Southwest.