
Author
Solar systems are remarkably low-maintenance, but “low” doesn’t mean “no.” Neglect basic upkeep and you’ll lose 15-25% production from dirty panels alone. Ignore warning signs and small issues become expensive failures. This guide covers daily monitoring habits, monthly maintenance tasks, seasonal deep-checks, and troubleshooting solutions for the most common problems. After three years maintaining my own 800W system through desert heat and mountain cold, I’ve learned which tasks actually matter and which are unnecessary busywork.
Understanding maintenance ensures your comprehensive RV power systems deliver reliable performance year after year without degradation or failures
Daily Monitoring: Five Minutes That Prevent Problems
I check my system every morning while drinking coffee. Takes five minutes and catches issues before they become expensive. Here’s my routine:
Check battery state of charge. My Victron monitor shows 87% this morning normal after overnight consumption running the fridge and some lights. Anything below 50% suggests yesterday’s solar production fell short, possibly from shade, dirty panels, or system malfunction.
Verify charging is active. By 8 AM in summer, my controller shows active charging with panels producing 15-20A. If I see zero current on a sunny morning, something’s wrong loose connection, blown fuse, or panel damage.
Watch for error codes. My charge controller displays error messages for overtemperature, overvoltage, battery disconnect, or other faults. Most days show no errors. When one appears, I investigate immediately rather than ignoring it.
Note peak production. My system typically peaks at 280-320W around noon. If peak drops to 200W for no obvious reason (weather looks fine, no shade), I know to inspect panels for dirt, damage, or connection issues.
Review yesterday’s yield. My controller logs daily amp-hours harvested. I typically see 140-180Ah daily. Sharp drops (under 100Ah on sunny days) indicate problems worth investigating.
This monitoring habit caught three issues in the past year: a corroded wire connection reducing output by 40%, bird droppings on one panel cutting production 15%, and a blown fuse after I accidentally reversed polarity during a modification. Each issue was simple to fix because I caught it immediately.
Weekly Tasks: 15 Minutes of Prevention
Once weekly, I do slightly deeper inspection beyond morning monitoring:
Visual panel inspection from the ground. I walk around my RV looking up at panels for obvious issues cracks, delamination, bird nests, accumulated dirt or debris. Binoculars help spot details without climbing up.
Check all visible wiring. I look for chafed insulation, loose wire ties, or UV damage to exposed cables. Wiring that’s rubbing against sharp edges will eventually short out. Better to catch it during inspection than after a failure.
Clean controller display and check temperatures. Dust accumulation on the controller screen is a proxy for dust inside the unit. A quick wipe with a dry cloth keeps things clean. I also feel the controller case it should be slightly warm during charging, not hot.
Test battery voltage under load. I turn on multiple high-draw items (fans, lights, laptop) and watch battery voltage. It should drop slightly but stabilize. Voltage that sags dramatically suggests battery issues or poor connections.
Document any anomalies. I keep a simple log on my phone: “Week of Dec 15: Output down 20%, found heavy dust on panels, cleaned, back to normal” This history helps identify patterns and track component aging.
Most weeks show nothing noteworthy. But the 10-15 minutes invested consistently prevents the occasional major issue from going unnoticed until it causes system failure.
Monthly Maintenance: The Deep Check
Once monthly, I spend 30-45 minutes doing thorough maintenance:
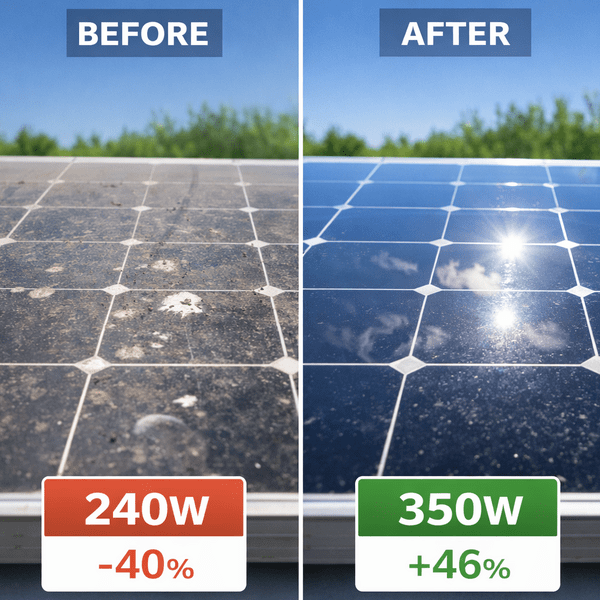
Clean panels properly. This is the single most impactful maintenance task. Dirty panels lose 15-25% efficiency more than any other factor except damage.
My cleaning process: Early morning or evening (avoid midday when panels are hot), spray with water, scrub gently with a soft brush or microfiber cloth, rinse thoroughly. Don’t use harsh cleaners or abrasive materials that scratch the glass.
In dusty desert camping, I clean every 2-3 weeks. In forested areas with tree debris, weekly. After rain in clean environments, maybe monthly.
Inspect all electrical connections. I check every connection point for corrosion, looseness, or heat damage. Battery terminals get particular attention corrosion here causes multiple problems. I clean terminals with a wire brush and apply dielectric grease to prevent future corrosion.
Verify mounting hardware tightness. Vibration from highway driving gradually loosens mounting bolts. I check and tighten as needed, being careful not to overtighten and crack panel frames or strip threads.
Test all breakers and fuses. I manually trip each breaker to ensure it operates correctly, then reset. Breakers can fail in the closed position, offering no protection if a fault occurs. monthly testing ensures they’ll work when needed.
Check roof sealant condition. I inspect Dicor sealant around all roof penetrations. Cracked or separated sealant means potential leaks. I carry a tube of Dicor and touch up any questionable areas immediately.
Seasonal Deep Maintenance
Twice yearly typically spring and fall I do comprehensive system maintenance:
Full panel inspection from roof. I climb up (carefully, with proper safety) and inspect each panel closely for cracks, hot spots, delamination, or junction box issues. I also check wiring that’s not visible from ground level.
Load test batteries. I discharge batteries to 30% then measure how long they take to recharge fully. This tests both battery capacity and solar charging performance. Significant deviation from baseline indicates battery degradation or system problems.
Measure system voltage drops. Using a multimeter, I measure voltage at multiple points: panel output, controller input, controller output, battery terminals. Voltage drop between points indicates resistance from corroded connections or undersized wire.
Retorque all connections. Electrical connections can loosen over time from thermal cycling. I carefully retighten every screw terminal to proper torque tight enough to secure without stripping threads.
Update charge controller settings if needed. Battery chemistry changes slightly as batteries age. I verify my charging parameters still match battery specifications and adjust if necessary.
Inspect and lubricate moving parts. If you have tilt mounts or other moving components, check pivot points, lubricate as needed, and verify locking mechanisms work properly.
Review annual production data. I compare this year’s total amp-hours harvested to previous years. A 10%+ decline suggests panel degradation or persistent efficiency losses worth investigating.
This deep maintenance takes 2-3 hours but provides comprehensive system assessment. I’ve caught several developing issues during seasonal checks that would have caused failures if left unaddressed.
Troubleshooting Common Problems
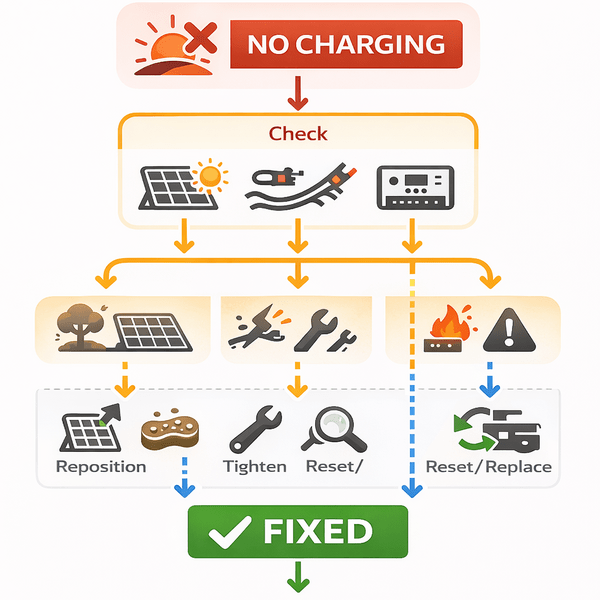
Problem 1: No Charging on Sunny Day
Symptoms: Controller shows zero input from panels despite clear weather and proper sun angle.
Diagnosis steps:
- Check panel voltage with multimeter should read close to rated voltage (18V per panel in series)
- Verify no blown fuses or tripped breakers between panels and controller
- Inspect MC4 connections for corrosion or looseness
- Check controller display for error codes
Common causes:
- Blown fuse (most common): Replace with properly rated fuse
- Loose MC4 connector: Disconnect, clean, reconnect firmly
- Tripped breaker: Reset and investigate what caused trip
- Failed charge controller: Rare, but measure input voltage to rule out
I’ve experienced this three times. Twice it was blown fuses from my own mistakes (reversed polarity, short circuit during modification). Once it was a corroded MC4 connection from water intrusion. All were simple fixes once diagnosed.
Problem 2: Low Power Output Despite Clean Panels
Symptoms: Production down 30-50% compared to normal with no obvious cause.
Diagnosis:
- Shade even partial shading on one panel drstically reduces series string output
- Panel damage cracks or hot spots from impact or manufacturing defect
- Charge controller malfunction not tracking maximum power point correctly
- Wiring issues resistance from coroded connections or undersized wire
Solutions:
- Reposition RV to eliminate shade if possible
- Inspect panels carefully for cracks or discoloration
- Measure voltage and current at multiple points to isolate problem
- Consider controller reset or firmware update
My most frustrating case was intermittent shade from a nearby tree. Took me two days to realize the shade pattern only hit my panels between 2-4 PM. Moving the RV 10 feet solved it completely.
Problem 3: Batteries Not Reaching Full Charge
Symptoms: Batteries stop at 85-90% charge despite continued sun and active charging.
Diagnosis:
- Charge controller absorption voltage set too low
- Charge controller absorption time too short
- Battery BMS limiting charge (lithium batteries)
- Temperature compensation preventing full charge in cold weather
Solutions:
- Verify absorption voltage matches battery specifications (typically 14.4V for lithium, 14.6V for AGM)
- Extend absorption time to 2-3 hours minimum
- Check battery temperature BMS may limit charging below freezing
- Disable temperature compensation if causing issues in cold weather
This happened to me when I switched from AGM to lithium batteries but forgot to update controller settings. The AGM charging profile couldn’t fully charge lithium chemistry. Fixed in five minutes once I realized the issue.
Problem 4: Rapid Battery Discharge Overnight
Symptoms: Batteries drop from 100% to 60% overnight with minimal loads.
Diagnosis:
- Phantom loads devices drawing power you’re not aware of
- Failed battery cell creating internal drain
- Inverter drawing standby power
- Battery capacity degradation from age
Solutions:
- Turn off all loads and measure battery current draw should be near zero
- Disconnect suspicious loads one at a time to isolate culprit
- Turn off inverter when not needed standby draw can be 1-2A
- Load test batteries to verify capacity matches rating
I discovered my inverter was drawing 1.5A continuously in standby mode 36Ah daily waste. Installing a cut off switch solved the problem instantly.
Problem 5: Controller Overheating
Symptoms: Controller running hot to touch, possibly showing temperature warnings.
Diagnosis:
- Inadequate ventilation around controller
- Controller oversized for installation space
- Ambient temperature too high
- Controller malfunction
Solutions:
- Ensure 3-4 inches clearance on all sides for airflow
- Add ventilation fans if mounting in enclosed space
- Relocate controller to cooler location if possible
- Contact manufacturer if overheating persists with proper ventilation
My controller initially overheated because I mounted it in a closed cabinet. Moving it to an open wall with airflow solved the issue completely.
When to Call a Professional
I’m pro-DIY for most maintenance, but some situations require professional help:
Persistent electrical issues you can’t diagnose. If you’ve checked everything obvious and the problem persists, a professional with proper test equipment can identify subtle issues quickly.
Roof leaks around penetrations. Small leaks become expensive interior damage. If you see water intrusion around cable entries, pay for professional resealing immediately.
High-voltage troubleshooting. If your system uses high-voltage series strings (100V+), leave troubleshooting to professionals unless you have electrical training. Dangerous voltage levels require expertise.
Warranty repairs. Many components require professional service to maintain warranty coverage. Don’t void warranties by attempting repairs yourself.
I’ve hired professionals twice in three years: once for a persistent connection issue I couldn’t isolate (turned out to be internal charge controller fault), and once for roof resealing after I botched a panel relocation.
Creating Your Maintenance Schedule
Based on three years of experience, here’s my recommended schedule:
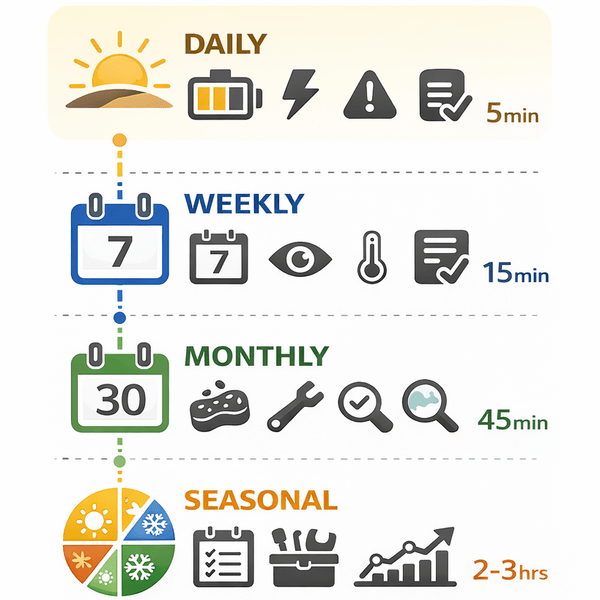
Daily (5 minutes):
- Check battery state of charge
- Verify charging is active
- Note any error codes
Weekly (15 minutes):
- Visual panel inspection
- Check visible wiring
- Document any anomalies
Monthly (45 minutes):
- Clean panels thoroughly
- Inspect and tighten electrical connections
- Check mounting hardware
- Test breakers and fuses
- Inspect roof sealant
Seasonal (2-3 hours, twice yearly):
- Full panel inspection from roof
- Load test batteries
- Measure system voltage drops
- Retorque all connections
- Review annual production data
This schedule has kept my system running flawlessly for three years while catching small issues before they become expensive problems. The time investment is minimal compared to the reliability benefits. Maintaining peak system performance through consistent monitoring and preventive care ensures that your carefully designed solar array, charge management, and battery integration continue delivering the reliable off-grid power that enables extended boondocking and true energy independence.
Learn more about designing complete off-grid power solutions that combine proper component selection with ongoing maintenance for energy independence