
Author
Professional solar installation runs $1,500-$3,000, but with basic electrical skills and the right guidance, you can tackle this project yourself over a weekend. This step-by-step tutorial covers everything from roof preparation and panel mounting to wiring your charge controller and integrating with existing batteries. We’ll walk through the actual installation process, including safety considerations and code requirements. For RVers ready to achieve energy independence, mastering these fundamentals makes future system expansions and upgrades straightforward.
Before You Start: Skills and Tools Required
Let’s be honest about what this project demands. If you’ve never worked with electrical systems or feel uncomfortable drilling holes in your RV roof, hire a professional. There’s no shame in paying for expertise a botched DIY job costs more to fix than professional installation costs upfront.
That said, this isn’t rocket science. I successfully installed my first system with zero solar experience, just basic electrical knowledge from household projects. If you can wire a light switch and use a drill confidently, you can handle this.
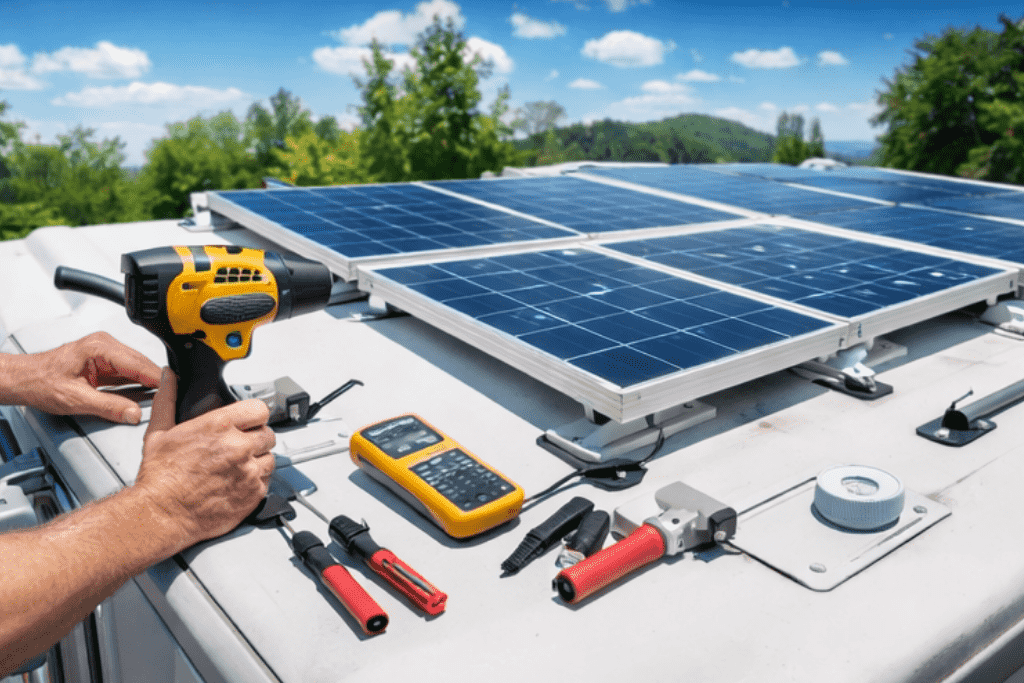
Essential tools you’ll need:
- Drill with various bits (including hole saw for cable entry)
- Wire strippers and crimpers
- Multimeter (critical for testing)
- Screwdrivers (Phillips and flathead)
- Wrenches and socket set
- Caulk gun with Dicor sealant
- Cable ties and mounting clips
- Heat gun for heat-shrink connectors
- Safety glasses and gloves
Materials for a basic 400W system:
- 4× 100W solar panels (or 2× 200W)
- MPPT charge controller (30-40A rating)
- MC4 connectors and solar wire (10 AWG)
- Battery cables (appropriate gauge for your system)
- Roof mounting brackets or rails
- Cable entry gland
- Breaker or fuse (between panels and controller)
- Breaker or fuse (between controller and battery)
Budget around $1,800-$2,200 for quality components. Don’t cheap out on the charge controller or wire these aren’t places to save $50.
Before purchasing, spend time calculating your exact solar panel requirements based on your actual consumption to avoid undersizing
Safety First: What Can Actually Hurt You
Solar panels generate electricity whenever light hits them. You can’t turn them off. This means you’re working with live voltage the moment you unbox panels in daylight. Treat every wire as live until proven otherwise with your multimeter.
Critical safety rules:
- Cover panels completely with opaque tarps during wiring
- Disconnect batteries before final controller connections
- Never work on the roof in wind, rain, or extreme heat
- Wear non-slip shoes RV roofs are surprisingly slippery
- Test every connection with a multimeter before energizing
The most dangerous moment is connecting the charge controller to your battery bank. Get polarity wrong, and you’ll create an arc that can weld metal, destroy equipment, and potentially start a fire. Triple-check positive and negative connections before making contact.
I’ve made exactly one scary mistake in three installations reversed polarity on a controller-to-battery connection. The resulting spark melted my wire terminal and nearly caught fire. Only my fuse saved me from destroying the entire system. Since then, I test obsessively with a multimeter before every connection.
Planning Your Panel Layout
Roof space is precious and oddly shaped on most RVs. You need to work around vents, air conditioners, antennas, and curved edges while maximizing sun exposure.
Walk on your roof with a tape measure and cardboard templates sized to your panels. Map out where everything will fit, keeping these guidelines in mind:
Avoid shade at all costs. Even partial shading on one panel reduces output dramatically. That roof vent might throw shadow for just two hours daily, but it’ll cost you 10-15% annual production. My first layout looked great until I realized my AC unit shaded the front panels every morning. Had to relocate everything.
Allow access for maintenance. Panels need cleaning several times yearly. Don’t mount them so tight you can’t reach between them with a brush. Leave at least 4 inches between panels and 6 inches from roof edges.
Consider wind loading. High-profile mounts catch wind and create stress on mounting points. I’ve seen panels rip off roofs at highway speeds due to inadequate mounting. Use multiple attachment points and quality brackets rated for vehicle use.
Think about expansion. If you might add more panels later, leave space and run oversized wire to the controller now. Adding capacity later is cheap if you planned ahead, expensive if you didn’t.
My final layout put two panels forward of the AC unit and two behind it, all wired in series-parallel for optimal voltage. This configuration gave me 400W with room to add another 200W later without rewiring following best practices for designing integrated power systems
Mounting: The Make-or-Break Step
Your mounting system determines whether panels stay put for 10 years or fly off on the interstate. I use aluminum rails rather than direct-mount brackets because rails distribute stress across multiple attachment points and make panel replacement easier.
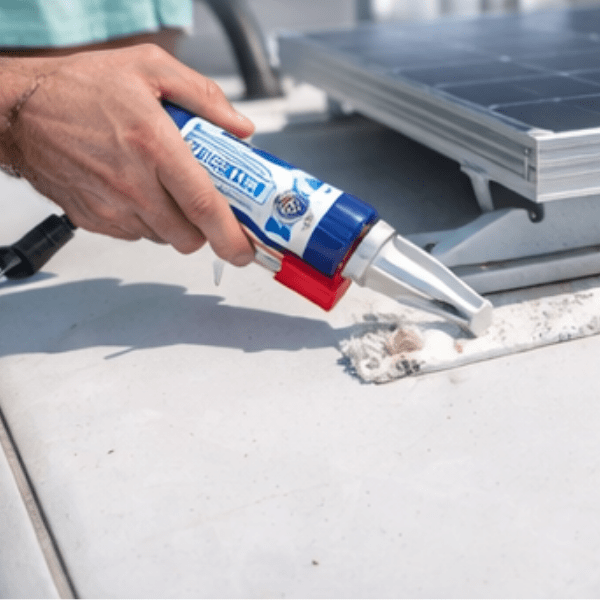
Roof penetrations are your enemy. Every screw hole is a potential leak. use Dicor self-leveling sealant on every penetration, and I mean every single one. Don’t use silicone it doesn’t bond to RV rubber roofing properly and will eventually leak.
Here’s my proven mounting process:
First, clean the mounting area thoroughly with denatured alcohol. Let it dry completely any moisture trapped under sealant creates leak paths.
Mark your rail positions carefully. Use a level to ensure rails run parallel to the RV centerline. Misaligned rails create stress points that crack over time.
Drill mounting holes through the roof. This is the scariest part because there’s no undo button. Use a bit sized for your screws (typically 1/4 inch) and drill straight down, not at an angle.
Apply a heavy bead of Dicor in each hole before inserting the screw. The goal is to completely fill the void around the threads. Excess sealant squeezes out that’s good, not wasteful.
Install rails with stainless steel screws. Tighten firmly but don’t overtorque you’ll crack the rubber membrane. Wipe away excess Dicor neatly because once it cures, it’s difficult to remove.
Let the sealant cure for 24 hours before mounting panels. Rushing this step invites leaks.
Attach panels to rails using the supplied hardware. Most quality panels use standard mounting holes that clamp to rails. Don’t overtighten you’ll crack the panel frame.
Running Wire: The Path to Your Charge Controller
Solar wire needs to reach from your panels to the charge controller location inside your RV. This requires drilling through the roof another permanent modification that demands careful execution.
Choose an entry point near your battery compartment to minimize wire runs. Shorter wire means less voltage drop and lower cost. I mounted my charge controller directly above my battery bank, keeping the run under 15 feet.
Cable entry gland installation:
Drill a hole sized for your cable gland (usually 1-1.5 inches). This is a big hole – measure twice, drill once. Position it where water can’t pool around the entry.
Install the cable gland with generous Dicor around the base. The gland should clamp the wires firmly to prevent movement that could eventually wear through the sealant.
Run your wires from panels down through the gland, leaving excess length inside. You can always trim excess, but you can’t add length without splicing (which should be avoided in solar installations).
Use cable clips every 12-18 inches to secure wiring to the roof. Loose wires flutter in wind and eventually abrade through insulation. I learned this after hearing mysterious vibrations at highway speed- turned out to be unsecured wire slapping against the roof.
Wiring Configuration: Series vs Parallel

This confuses everyone initially, but it’s simpler than it seems. You can wire panels in series (connecting positive of one panel to negative of the next) or parallel (all positives together, all negatives together).
Series wiring adds voltage while maintaining amperage. Four 100W panels rated 18V and 5.5A in series produce 72V at 5.5A. This higher voltage reduces wire losses over long runs and works better with MPPT charge controllers.
Parallel wiring adds amperage while maintaining voltage. The same four panels in parallel produce 18V at 22A. This requires heavier wire but offers some shade tolerance – one shaded panel doesn’t kill the entire string.
I use series-parallel configuration: two panels in series, then two series strings in parallel. This gives me 36V at 11A – a good balance of voltage for MPPT efficiency and amperage that doesn’t require massive wire.
Whatever configuration you choose, match your charge controller’s input voltage rating. Most controllers handle 100-150V maximum input. Exceed that, and you’ll destroy the controller instantly.
Charge Controller Installation
Your MPPT charge controller is the brain of the system, converting solar panel voltage to the correct charging voltage for your batteries. Mount it close to batteries in a ventilated area controllers generate heat and need airflow.
Installation sequence matters critically:
First, connect the controller to the battery bank. Always batteries first, panels last. This allows the controller to detect battery voltage and set charging parameters correctly.
Use appropriately sized wire based on amperage and distance. For my 30A controller with 3-foot battery runs, I use 10 AWG wire. Undersized wire creates resistance, heat, and voltage drop that kills efficiency.
Install a breaker between the controller and battery. Size it for 125% of maximum controller output a 30A controller gets a 40A breaker. This protects your system from shorts and provides an easy disconnect for maintenance.
Connect negative first, then positive. This minimizes spark risk if you accidentally touch metal with your wrench.
With the battery connected, the controller should power on and display voltage. If not, recheck connections immediately something’s wrong.
Now connect the solar panels. Again, negative first, then positive. The controller should detect incoming power and begin charging. Watch for any error codes or warnings on the display.
Testing and Commissioning
Before calling the job complete, spend 30 minutes verifying everything works correctly.
Use your multimeter to measure:
- Panel output voltage (should match rated voltage)
- Current flow into controller (should match expected wattage ÷ voltage)
- Battery charging voltage (should be 14.4V for lithium, 14.6V for AGM)
- No voltage between system ground and RV frame
Check all connections for heat. Warm connections indicate resistance from loose terminals or undersized wire. Tighten or upsize as needed.
Monitor charging for a full sunny day. Current should peak at midday and taper off as batteries reach full charge. If current stays constant all day, your charge controller settings may be incorrect.
Verify the controller stops charging when batteries reach full capacity. Overcharging damages batteries and indicates controller malfunction.
Common Mistakes That Cost Money
After helping friends install their systems, I’ve seen the same errors repeatedly:
Mistake 1: Mixing panel types or wattages in series. This creates current mismatch that drastically reduces output. Use identical panels in series strings.
Mistake 2: Undersized wire to save $20. Voltage drop from thin wire wastes more power annually than the wire cost saves. Use proper gauge wire.
Mistake 3: Skimping on sealant. Leaks don’t appear immediately – they develop slowly and destroy your RV interior over time. Use too much sealant rather than too little.
Mistake 4: Mounting panels directly over slide-outs. When the slide extends, it can push against the panels from below. Leave clearance.
Mistake 5: Not testing individual components before installation. That DOA panel or defective controller wastes an entire day if you discover it after mounting everything.
Your First Week With Solar
The initial excitement of seeing free power flowing into your batteries is genuinely thrilling. You’ll check your charge controller obsessively, watching watts climb as the sun rises and celebrating each amp-hour of charge.
After a week, the novelty wears off and solar becomes invisible infrastructure – exactly as it should be. You’ll stop thinking about power and start enjoying the freedom to camp wherever you want for as long as you want.
The sense of accomplishment from DIY installation adds satisfaction beyond the money saved. Every time I look at my panels, I remember the weekend spent installing them and feel proud of the self-sufficiency they represent.
For RVers ready to take control of their power systems and unlock true boondocking freedom, this installation is just the beginning of understanding how integrated solar arrays, battery banks, and charge management create reliable off-grid capability for extended adventures
1 thought on “DIY RV Solar Installation: Complete Step-by-Step Guide (2026)”