Author
I’ll never forget the moment I realized I’d become a slave to campground hookups. There I was, planning a trip through Utah’s incredible canyon country, and every decision hinged on one question: “Where can I plug in?” The most spectacular boondocking spots were off-limits because I couldn’t survive more than two nights without shore power.
That frustration led me down the solar rabbit hole. Three years and $7,200 later, I’m writing this from a remote Arizona desert location where I’ve been camped for 11 days straight. My batteries are at 82%, my fridge is humming along, my laptop is charging, and I haven’t thought about finding a campground once.
Building an effective RV power system isn’t complicated, but it does require understanding how batteries, solar panels, charge controllers, and inverters work together as an integrated system. Get the sizing wrong, and you’ll waste thousands on equipment that can’t keep up with your needs. choose the wrong components, and you’ll replace failed batteries every few years instead of enjoying decades of reliable power.
This guide compiles everything I’ve learned through extensive research, expensive mistakes, and three years of daily off-grid living. Whether you’re building your first system or upgrading an inadequate one, you’ll find practical guidance based on real-world experience, not theoretical calculations.
Understanding Your RV Power Needs
Before spending a dollar on solar panels or batteries, you need honest data about your actual power consumption. Most people dramatically underestimate their usage, then build systems that fall short within weeks.
grab a notepad and inventory every device in your RV that draws power. For each item, note its amperage (or wattage) and realistic daily runtime. Your refrigerator doesn’t run constantly it cycles based on temperature. Your lights aren’t on 24 hours maybe 4-5 hours evening use. Your laptop charges for 2-3 hours, not all day.
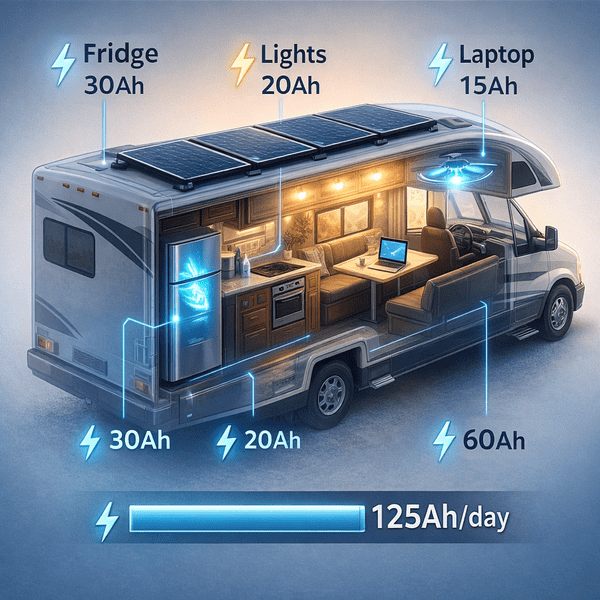
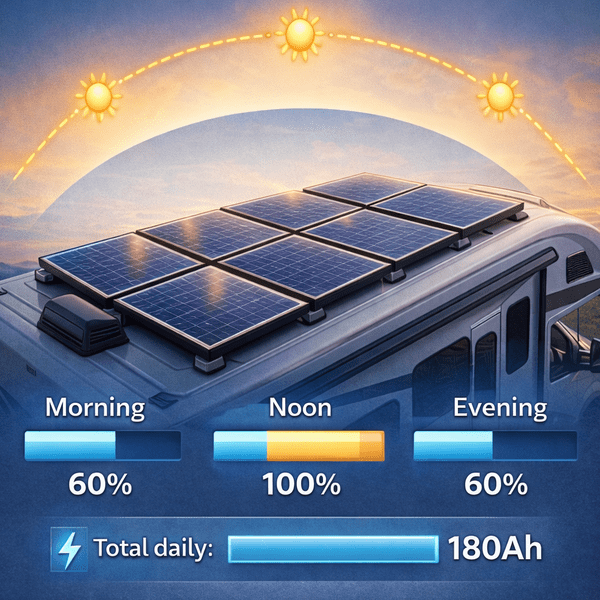
Here’s my daily consumption breakdown as a full-time RVer working remotely:
- 12V Refrigerator: 5 amps × 10 hours = 50Ah (cycles on/off, roughly 40% runtime)
- LED Lighting: 6 lights × 1 amp × 4 hours = 24Ah
- Water Pump: 6 amps × 15 minutes = 1.5Ah
- Laptop Charging: 5 amps × 3 hours = 15Ah
- Phone Charging: 1 amp × 2 hours = 2Ah
- Fans (summer): 6 amps × 12 hours = 72Ah
- Microwave (occasional): 100 amps × 0.1 hours = 10Ah
Summer total: 175Ah daily
Winter total: 105Ah daily (no fans, less fridge runtime)
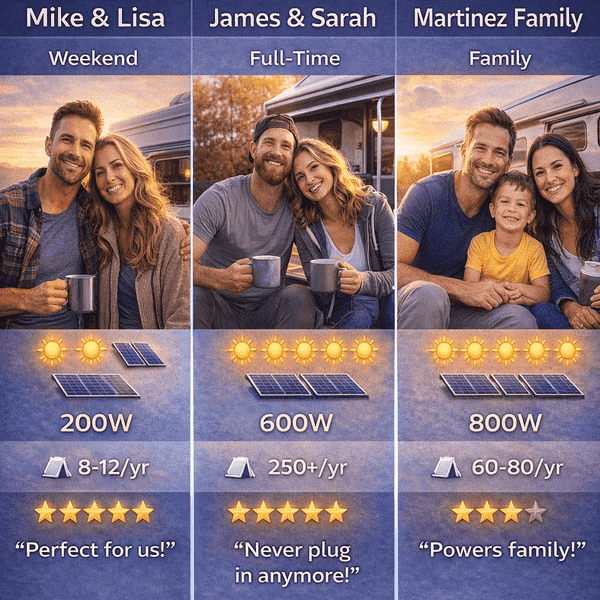
Your consumption will differ based on family size, climate, and lifestyle. A couple camping weekends might use 60-80Ah daily. a family with teenagers could hit 250Ah. Remote workers need more power than retirees who mostly read books.
the critical insight: your consumption varies dramatically by season, weather, and activity level. Size your system for realistic worst-case scenarios, not optimistic averages. A system that barely keeps up on perfect days will fail you when weather turns cloudy or temperatures require fans or heating.
Free Power Calculator: Understanding your baseline consumption is foundational to building effective systems. Use our interactive calculator to input your specific appliances and get personalized recommendations for solar and battery capacity.
RV Battery Types: Complete Comparison Guide
Your battery bank is the heart of your power system it stores the energy your solar panels generate and delivers it when needed. Choose poorly and you’ll replace batteries every 2-3 years while dealing with limited usable capacity. Choose wisely and you’ll enjoy 10-15 years of reliable service.
Lithium (LiFePO4) Batteries: The Modern Standard
Lithium batteries have revolutionized RV power systems, and after two years running Battle Born lithium batteries, I’ll never go back to lead-acid technology.
Key advantages:
- Usable capacity: 90-95% of rated capacity is safely usable versus 50% for lead-acid
- Lifespan: 3,000-5,000 cycles (10-15 years typical use) versus 300-500 for AGM
- Weight: 55 pounds for 200Ah lithium versus 130 pounds for equivalent AGM
- Charge speed: Accepts full charging current until 95%+ full versus tapering acceptance in lead-acid
- Maintenance: Zero maintenance beyond monitoring
Downsides:
- Cost: $700-900 per 100Ah versus $150-200 for AGM
- Cold charging: Cannot charge below 32°F without damage (premium models include automatic heating)
- Initial investment: 3-4× upfront cost versus AGM
Real-world experience: My 400Ah lithium bank cost $3,200 painful initially. But I’ve logged 600+ cycles over two years with zero maintenance and 97% capacity retention. My previous AGM batteries needed replacement every 28 months at $680 per set. The lithium batteries will outlast four AGM replacements while delivering better performance throughout.
AGM Batteries: The Budget Option
AGM (Absorbed Glass Mat) batteries represent the middle ground between flooded lead-acid and lithium. I ran AGM batteries for four years before upgrading to lithium.
Key advantages:
- Lower cost: $150-200 per 100Ah versus $700-900 for lithium
- No charging restrictions: Works fine in freezing temperatures
- Familiar technology: Well-understood by RV technicians
- Immediate availability: Sold everywhere
Downsides:
- Limited usable capacity: Only 50% safely usable (100Ah usable from 200Ah rated)
- Short lifespan: 300-500 cycles (2-4 years typical use)
- Heavy: 2-3× weight of equivalent lithium capacity
- Slow charging: Acceptance rate drops significantly above 80% charge
When AGM makes sense: If you primarily camp with hookups and only boondock occasionally, AGM’s lower cost can be justified. For serious boondocking or full-time living, the long-term economics favor lithium despite higher upfront costs.
Side-by-Side Comparison Table
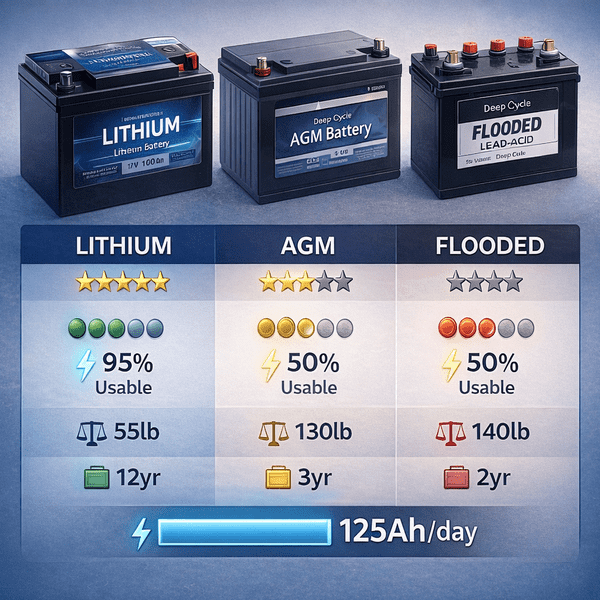
| Feature | Lithium LiFePO4 | AGM | Flooded Lead-Acid |
| Usable Capacity | 90-95% | 50% | 50% |
| Cycle Life | 3,000-5,000 | 300-500 | 200-300 |
| Typical Lifespan | 10-15 years | 2-4 years | 1-3 years |
| Weight (200Ah) | 55 lbs | 130 lbs | 140 lbs |
| Cost per 100Ah | $700-900 | $150-200 | $100-150 |
| Maintenance | None | None | Monthly water checks |
| Cold Charging | Limited (<32°F) | Good | Good |
| Charge Speed | Fast | Moderate | Slow |
10-Year Total Cost of Ownership
This is where lithium’s economics become compelling:
AGM Route (400Ah rated = 200Ah usable):
- Initial: $600 (4× 100Ah AGM)
- Replacements (every 2.5 years): $600 × 3 = $1,800
- Extra weight fuel cost (estimated): $3,000
- Total: $5,400
Lithium Route (200Ah rated = 180Ah usable):
- Initial: $1,600 (2× 100Ah lithium)
- Replacements: $0 (10+ year lifespan)
- Total: $1,600
The lithium setup costs $3,800 less over 10 years while providing better performance throughout. That “expensive” lithium battery is actually the economical choice with honest accounting.
Lithium Battery Deep Dive
once you’ve decided on lithium (and you should), several factors determine which specific batteries to buy.
Battery Capacity: How Much Do You Need?
The formula is straightforward: Daily consumption × 2 = minimum battery capacity. This provides one day’s consumption plus 100% reserve for cloudy weather or high-usage days.
My 175Ah summer consumption requires 350Ah minimum. I run 400Ah for comfortable headroom. During a recent four-day cloudy stretch, my batteries never dropped below 35% exactly the buffer I needed.
Weekend warriors using 80Ah daily can function with 200Ah batteries. Full-timers or families should plan for 300-600Ah depending on consumption levels.
Critical insight: Battery capacity matters more than solar panel wattage for most RVers. Adequate capacity provides buffer for weather variability. You can always run a generator to recharge depleted batteries, but you can’t create battery capacity that doesn’t exist.
Top Lithium Battery Brands
After testing multiple brands over three years and talking with dozens of RVers, clear quality tiers emerge:
Premium Tier ($900-1,000 per 100Ah):
- Battle Born: Best warranty (10 years), internal heating, exceptional customer service
- RELiON: Nearly identical performance to Battle Born, slightly lower cost
- Dakota Lithium: Best cold-weather performance, 11-year warranty
Mid-Range Tier ($650-750 per 100Ah):
- Renogy: Solid performance, good Bluetooth monitoring, 5-year warranty
- Dragonfly Energy: Excellent build quality, 10-year warranty, limited availability
Budget Tier ($500-600 per 100Ah):
- Ampere Time: Acceptable performance, shorter warranty, adequate for casual use
- Eco-Worthy: Bare-bones functionality, 3-year warranty, quality control concerns
I run Battle Born batteries because customer service matters when you’re camping remotely and need technical support. The premium cost ($1,600 vs $1,100 for budget options) buys peace of mind and proven longevity.
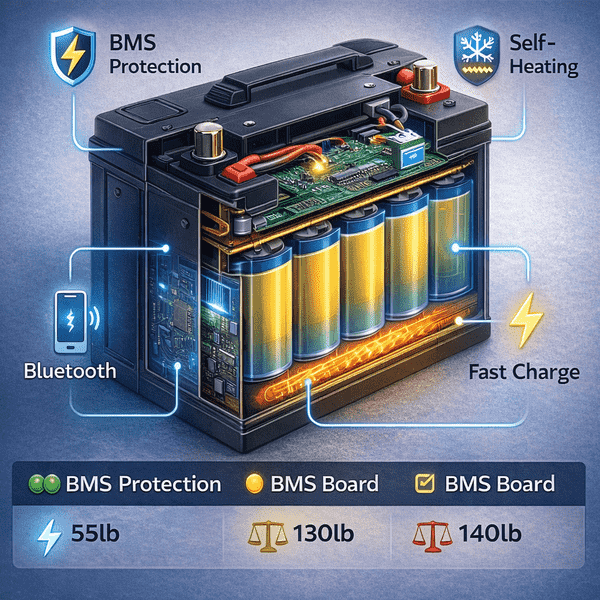
Battery Management Systems (BMS)
Every lithium battery includes a BMS that protects against:
- Overcharge (prevents voltage exceeding safe limits)
- Over-discharge (cuts output before damaging cells)
- Temperature extremes (stops charging when too cold, limits discharge when too hot)
- Short circuits (immediately disconnects during faults)
- Cell imbalance (ensures all cells charge equally)
Premium batteries include more sophisticated BMS with features like Bluetooth monitoring, programmable parameters, and automatic low-temperature heating. Budget batteries have basic protection that works adequately but lacks advanced features
The BMS reliability matters more than you’d think. I’ve seen cheap batteries with inadequate BMS protection fail catastrophically bulging cases, smoking terminals, complete failure. Premium brands consistently deliver reliable BMS operation for years
Solar Panel Systems for RVs
solar panel convert sunlight into electricity that charges your batteries. Proper panel selection and sizing determines whether your system delivers reliable power or leaves you generator-dependent
How Many Watts Do You Really Need?
The calculation: (Daily consumption in Wh ÷ Peak sun hours ÷ System efficiency) × 1.4 weather buffer
Using my 175Ah daily summer consumption (2,100Wh) :
- peak sun hours in Arizona summer: 6 hours
- System efficiency: 70% (acounts for temperature losses, angle, controller efficiency)
- Calculation: (2,100 ÷ 6 ÷ 0.70) × 1.4 = 700W minimum
I run 800W because the $150 difference between 700W and 800W was negligible, and extra capacity helps during shoulder seasons with fewer sun hours.
Critical reality check: Solar panels never produce rated wattage in real conditions. My 800W array peaks at 550-600W due to temperature losses, suboptimal mounting angle, and atmospheric conditions. Always calculate using 65-75% of rated capacity for realistic expectations.
Rigid vs Flexible Solar Panels
I’ve run both types and strongly recommend rigid panels for permanent installations:
Rigid Panels:
- Cost: $0.80-1.20 per watt
- Efficiency: 80-88% of rated capacity (air circulation keeps them cool)
- Lifespan: 20-25+ years with minimal degradation
- Installation: More complex (mounting rails, brackets, roof penetrations)
Flexible Panels:
- Cost: $1.50-2.00 per watt
- Efficiency: 60-70% of rated capacity (no air circulation, runs 20-25°F hotter)
- Lifespan: 5-8 years typical before significant degradation
- Installation: Simple (adhesive mounting, no penetrations)
I wasted $800 on flexible panels that degraded to 65% output in three years. The easy installation wasn’t worth replacing the entire array prematurely. Rigid panels require one afternoon of careful work but deliver superior performance for decades
Monocrystalline vs Polycrystalline
Monocrystalline panels (black, uniform appearance) offer 18-22% efficiency and better low-light performance. Polycrystalline panels (blue, varied appearance) offer 15-17% efficiency at slightly lower cost.
For RV installations, choose monocrystalline. The 3-5% efficiency advantage matters when roof space is limited. The cost difference ($20-30 per panel) is negligible compared to total system investment.
MPPT Charge Controllers Explained
your charge controler sits between solar panels and batteries, converting panel voltage to proper battery charging voltage while maximizing power harvest.
PWM vs MPPT: Not Even Close
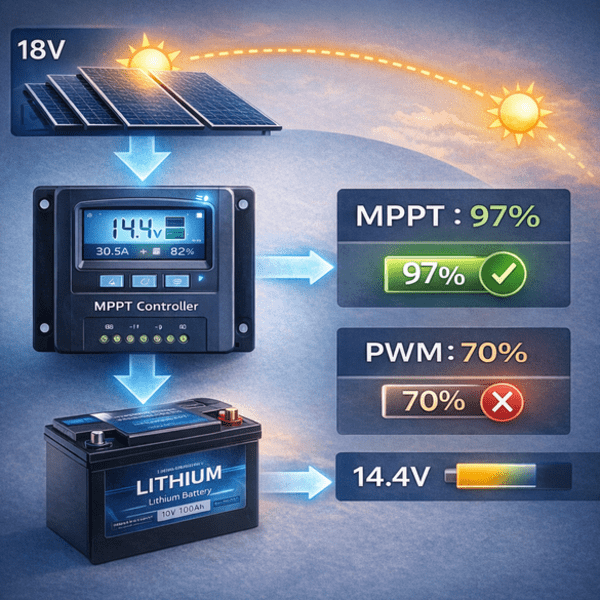
PWM (Pulse Width Modulation) controllers simply connect panels directly to batteries when charging is needed. If your 18V panels charge 12V batteries, you waste 6V worth of power roughly 30% of potential generation.
MPPT (Maximum Power Point Tracking) controllers use DC-to-DC conversion to transform excess voltage into additional current. Those same 18V panels convert to 12V at higher amperage, capturing the wasted power. MPPT delivers 25-30% more charging power for a $100-150 premium that pays for itself within a year through increased efficiency.
I ran PWM for six months before upgrading to MPPT. Daily yield immediately jumped from 110Ah to 145Ah 35Ah additional charging from identical panels. Never use PWM controllers in any serious system.
Sizing Your Charge Controller
Controllers are rated by maximum input voltage and maximum output current.
Voltage rating: Add voltages of panels wired in series and choose a controller rated 25% higher for safety. My 36V series-parallel array needs a 100V controller minimum (36V × 1.25 = 45V, but 100V is standard available rating).
Current rating: Divide total panel watts by battery voltage and multiply by 1.25. My 800W
array: (800W ÷ 12V) × 1.25 = 83A theoretical maximum. I use a 60A controller because real-world production rarely exceeds 550W (46A), making 60A adequate with headroom.
Top MPPT Controllers
Victron SmartSolar ($190-350 depending on size): Industry-leading efficiency (97-98%), excellent Bluetooth app, programmable charging profiles, proven reliability. My personal choice after testing multiple brands.
Renogy Rover ($170-250): Solid 95-96% efficiency, decent LCD display, good value for budget-conscious buyers. Several friends run these with good results.
EPEVER Tracer ($130-180): Budget option with 93-94% efficiency and basic functionality. Adequate for simple systems but lacks refinement of premium options.
The Victron premium is justified by superior efficiency, better monitoring, and exceptional customer support. Over 10 years, the 2-3% efficiency advantage delivers hundreds of dollars in additional charging versus budget controllers.
Inverters: Converting DC to AC Power
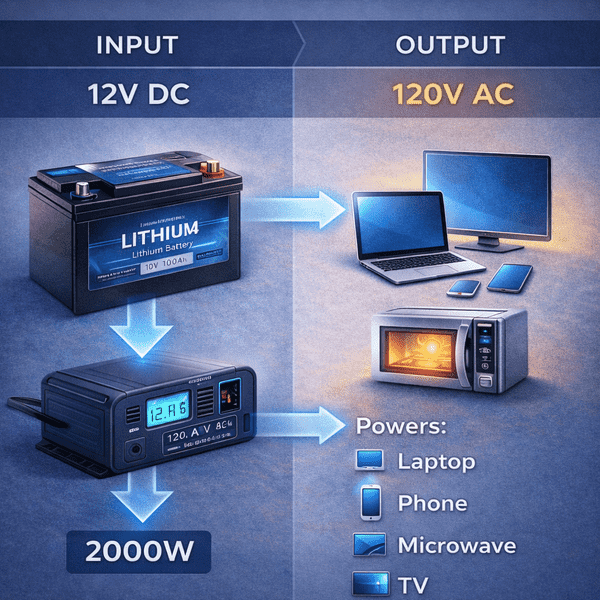
Inverters convert 12V DC battery power to 120V AC for running standard household appliances. Not every system needs an inverter if you only use 12V devices, skip this component and save $500-1,000.
Pure Sine Wave vs Modified Sine Wave
Pure sine wave inverters produce clean AC power identical to utility power. Modified sine wave produces cheaper approximation that works for resistive loads (lights, heaters) but can damage sensitive electronics.
Always buy pure sine wave. The $50-100 premium over modified sine wave is insignificant insurance against damaged laptops, TVs, or medical devices. I’ve never regretted spending $600 on a quality pure sine wave inverter.
Sizing Your Inverter
Add up wattage of all AC devices you’ll run simultaneously, multiply by 1.25 for surge capacity:
- Microwave: 1,000W
- Laptop charger: 100W
- Phone chargers: 20W
- Total: 1,120W × 1.25 = 1,400W minimum
I run a 2,000W inverter for comfortable headroom. The extra capacity costs $100-150 more than a 1,500W unit but allows future expansion and eliminates concerns about overload.
Critical consideration: Inverters draw significant current from batteries. My 1,000W microwave draws 85-90A from my 12V battery bank. Ensure your battery cables and connections can handle these loads undersized wiring creates dangerous heat and voltage drop.
Inverter/Charger Combination Units
Many RVers choose inverter/charger combos that serve triple duty: inverter, battery charger from shore power, and transfer switch. Victron MultiPlus ($1,200-2,000) and Magnum Energy ($900-1,500) are popular choices.
I run a separate inverter and charge controller because I rarely use shore power. But for RVers who mix hookup camping with boondocking, inverter/chargers simplify installation and provide seamless power management.
Complete System Configurations & Costs
Real-world system examples with actual component lists and costs:
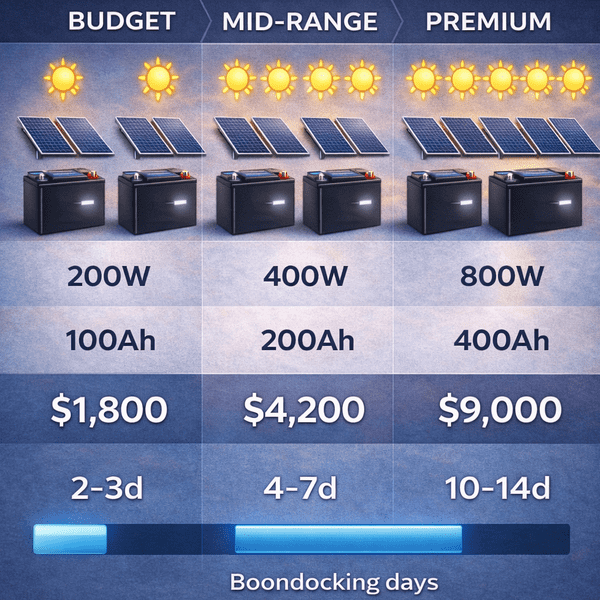
Budget Setup: Weekend Warrior ($2,000-2,800)
Components:
- 2× 100W solar panels (Renogy): $240
- 20A MPPT controller: $95
- 100Ah lithium battery: $650
- 1,000W pure sine inverter: $250
- Wiring, mounts, hardware: $120
- DIY Total: $1,355
- Professional Install: $2,155 (+$800 labor)
Performance: Generates 60-80Ah daily, supports basic loads for 2-3 days boondocking. Adequate for weekend camping couples with modest power needs.
Mid-Range Setup: Extended Travel ($4,000-5,500)
Components:
- 4× 100W solar panels (Renogy): $400
- 30A MPPT controller (Victron): $190
- 200Ah lithium battery (Renogy): $1,200
- 2,000W pure sine inverter: $450
- batery monitor (Victron): $180
- Wiring, mounts, hardware: $200
- DIY Total: $2,620
- Professional Install: $3,820 (+$1,200 labor)
Performance: Generates 120-160Ah daily, supports moderate to high loads for 4-7 days boondocking. Ideal sweet spot for serious RVers who regularly boondock.
Premium Setup: Full-Time Boondocking ($7,000-10,000)
Components:
- 8× 100W solar panels (quality brands): $800
- 60A MPPT controller (Victron): $350
- 400Ah lithium batteries (Battle Born): $3,200
- 3,000W inverter/charger (Victron): $1,800
- Battery monitor with shunt: $220
- Professional mounting system: $350
- Wiring, breakers, hardware: $300
- DIY Total: $7,020
- Professional Install: $9,520 (+$2,500 labor)
Performance: Generates 240-320Ah daily, supports everything except continuous AC operation indefinitely. Enables true off-grid living for full-timers.
DIY Installation vs Professional
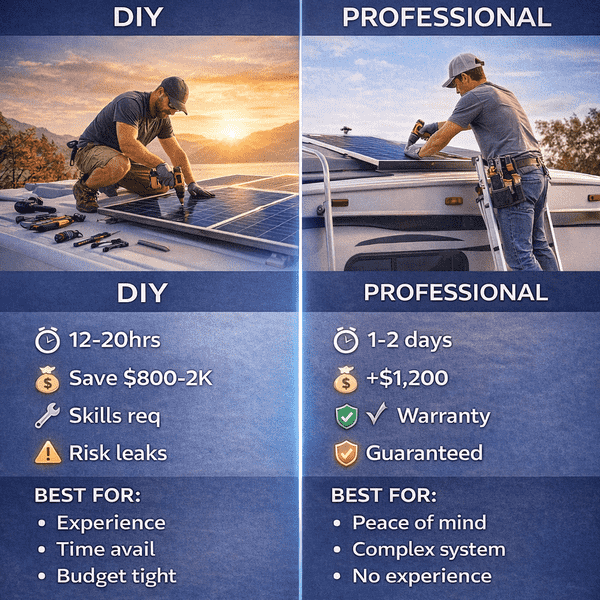
I’ve done both and here’s my honest assessment:
DIY Advantages:
- Save $800-2,500 on labor (30-40% of total cost)
- Learn system intimately for easier troubleshooting
- Work on your schedule without waiting weeks for installer availability
- Pride of ownership
DIY Challenges:
- Risk of roof leaks from improper sealing ($1,000-5,000 damage potential)
- Time investment (12-20 hours for first-time installers)
- Tool purchase if not owned ($150-300)
- Mistakes can damage expensive components
Professional Advantages:
- Zero leak risk with experienced installer
- Faster completion (1-2 days versus 2-3 weekends)
- Warranty on installation work
- Proper permitting and code compliance if required
Professional Disadvantages:
- High labor costs ($800-2,500 depending on system complexity)
- Less understanding of your system
- Scheduling delays (2-4 weeks typical)
My recommendation: If you’re mechanically inclined and comfortable working on your roof, DIY saves significant money. If you’ve never worked with electrical systems or worry about damaging your RV, professional installation provides peace of mind worth the premium.
Return on Investment & Long-Term Savings
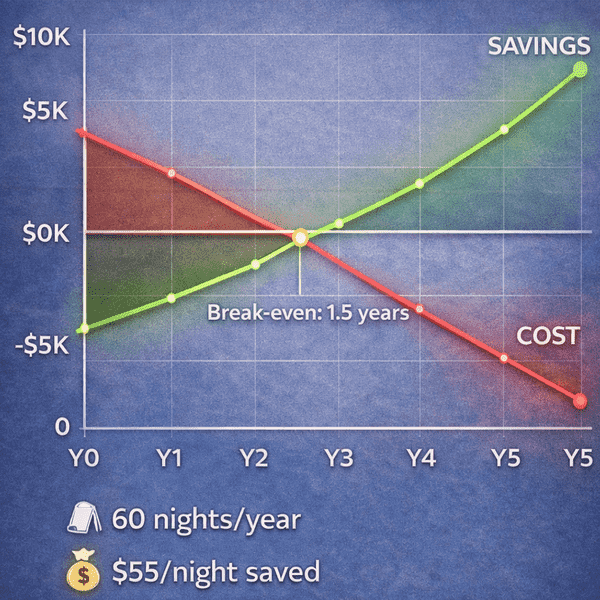
The financial case for solar becomes overwhelming when you camp frequently.
Calculating Your Payback Period:
At 70 nights annually boondocking versus $55/night campgrounds:
- Annual savings: 70 × $55 = $3,850
- System cost: $4,200 (my actual mid-range system)
- Payback: 1.1 years
After 13 months, every night boondocking is pure $55 savings. Over 10 years, that’s $38,500 in avoided campground fees nearly 10× my initial investment.
Even casual campers see reasonable payback. At 30 nights annually:
- Annual savings: 30 × $55 = $1,650
- $2,500 budget system payback: 1.5 years
- 10-year savings: $16,500
Additional Benefits Beyond Direct Savings:
- Camp in spectacular locations unavailable to hookup-dependent RVers
- Eliminate generator noise and fuel costs ($10-15 daily)
- Increase RV resale value (quality solar adds $3,000-5,000 to sale price)
- Freedom to extend trips without worrying about depleted batteries
The economics favor solar for anyone camping more than 25-30 nights annually. Below that threshold, the payback stretches to 3-5 years but still represents solid long-term value.
Maintenance & Longevity
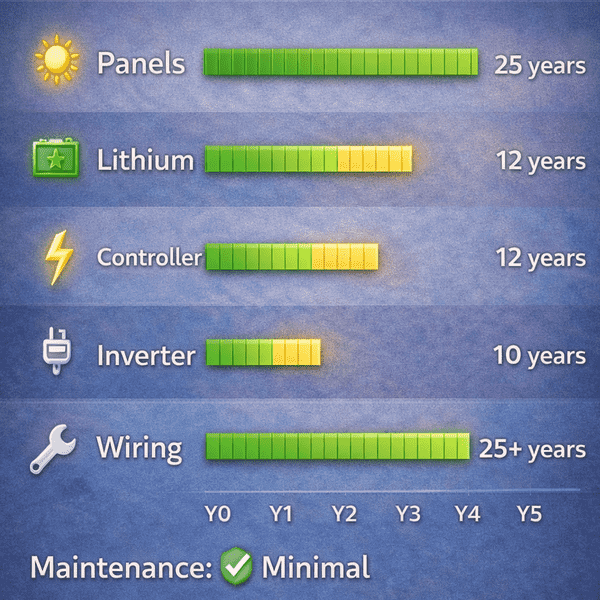
Solar systems require minimal maintenance but aren’t completely maintenance-free
Monthly tasks (30 minutes):
- Clean panels with water and soft brush (15-25% efficiency gain when dirty)
- Check all electrical connections for corrosion or looseness
- Verify charge controller operation and error-free status
- Inspect roof sealant around penetrations
Seasonal tasks (2 hours, twice yearly):
- Deep panel cleaning and inspection from roof
- Measure system voltage drops at multiple points
- Load test batteries to verify capacity
- Retorque all electrical connections
- Review annual production data for degradation trends
In three years, I’ve spent roughly 20 hours total on maintenance far less time than I spent dealing with generator maintenance, fueling, and repairs previously. The return on that minimal investment is 1,000+ hours of reliable off-grid power.
Component longevity:
- Solar panels: 20-25 years (guaranteed 80% capacity)
- Lithium batteries: 10-15 years or 3,000-5,000 cycles
- Charge controllers: 10-15 years
- Inverters: 8-12 years
- Wiring and hardware: Indefinite with proper installation
Your system should provide 15-20 years of service with only battery replacement needed around year 10-12. That longevity makes the high initial investment a fraction of the cost per year of use.
Conclusion: Making It Real
Building an effective RV power system transformed my camping experience more than any other upgrade I’ve made. The freedom to camp anywhere for weeks at a time, without worrying about finding hookups or running generators, is genuinely life-changing.
The initial investment feels substantial $4,000-7,000 for most serious systems. But spread over 15+ years of reliable service and hundreds of nights avoiding $50+ campground fees, the economics are compelling. You’re not spending money; you’re making an investment that pays dividends for decades.
Start by honestly calculating your power consumption. Size your battery bank for 2× daily consumption. Add solar panels at 1.4-1.5× daily consumption divided by realistic sun hours and system efficiency. Choose quality components that justify their premium through longevity and reliability. Install carefully or hire professionals to avoid expensive mistakes.
The system I’ve described works. I know because I’ve lived with it daily for three years through every season and weather condition. It’s powered my full-time remote work, kept my food cold through desert heat, and enabled camping experiences impossible without energy independence.
Your specific system will differ based on your RV size, family size, climate, and camping style. But the principles remain constant: adequate battery capacity provides resilience, sufficient solar generation maintains charge, quality components last for years, and proper integration creates synergistic efficiency. For RVers ready to embrace true off-grid capability and energy independence, comprehensive power systems deliver freedom worth far more than their cost. Understanding how solar panels, charge controllers, battery banks, and inverters work together enables you to design solutions perfectly matched to your needs whether you’re a weekend warrior seeking occasional boondocking or a full-timer embracing extended remote camping as a lifestyle